
Hi, how can we help?
- How to transfer a Location between End Users
- Installation Checklist
- Resolving fallback waiting error (for Installers only)
- How to commission a NexBlue Charge Point
- How to connect charge point to 4G during/after installation
- How to create and manage Locations
- What is a Location and why is it important?
- How to transfer ownership to customer (NexBlue Partner App)
- Phase rotation
- Fallback waiting error
- Where is the pin for my charge point/Zen?
- How to make a charge point tethered (lead stays plugged in)
- How to change brightness of charge point light
- How to add a charge point/load balancer to your Location
- How to commission a NexBlue Charge Point
- How to connect charge point to 4G during/after installation
- RCD Test Procedure
- How to check if a product has been encountering any unexpected behavior
- Residual Current Protection
- Phase rotation
- Connect the NexBlue Zen (Load Balancer) to the NexBlue Cloud
- Fallback waiting error
- Where is the pin for my charge point/Zen?
- Resolving fallback waiting error (for Installers only)
- How to add a charge point/load balancer to your Location
- How to use solar energy to charge your car
- How to check if a product has been encountering any unexpected behavior
- How to Connect the NexBlue Zen (Smart Meter) to Wi-Fi
- Integrate solar panel terminal with Load balancer
- How to add a Location thats been shared with you
- Where is the pin for my charge point/Zen?
- How to share a location with an individual/organisation
- How to create/join/invite someone to an Organisation
- How to connect charge point to 4G during/after installation
- How to carry out a factory reset of a product
- How to create and manage Locations
- How to check if a product has been encountering any unexpected behavior
- Charging status
- Phase rotation
- How to transfer ownership to end customer (Partner Portal)
- Pre-configuration: Remotely complete the installation configuration on the portal
- Does every new installer need to get a username and password?
- How to change the main fuse on the Partner Portal?
- How to transfer a Location between End Users
- How to connect a charger to WiFi
- Exporting charging data
- Connect the NexBlue Zen (Load Balancer) to the NexBlue Cloud
- Fallback waiting error
- Where is the pin for my charge point/Zen?
- How to make a charge point tethered (lead stays plugged in)
- How to change brightness of charge point light
- How to add a charge point/load balancer to your Location
- How to connect to your tariff (EcoPilot)
- How to set max charging current
- How to set the charging schedule
- Someone else wants to use my charge point, how can I share it with them?
- How to use solar energy to charge your car
- How to add a charge point in the myNexBlue App
- How to Connect the NexBlue Zen (Smart Meter) to Wi-Fi
- How to configure single phase charging?
- Charger or Load Balancer Not Connecting via Bluetooth
- Firewall Requirements for NexBlue Charge Points
- Resolving fallback waiting error (for Installers only)
- Why have I received an email alert about my charge point(s)?
- My charge point is switched on but the light on the unit is not on
- RCD Test Procedure
- Event List
- How to check if a product has been encountering any unexpected behavior
Pre-configuration: Remotely complete the installation configuration on the portal
Table of Contents
This feature is exclusive to organization members. If you cannot find the Pre-configuration in the menu, kindly ensure that your account has been approved for organization permission.
What scenarios is pre-configuration prepared for?
- Bulk Charger Installation: Imagine you receive an order to install 20 chargers. This means you will spend a significant amount of time on installation and configuration. With the pre-configuration feature, you can leave after completing the installation and powering on the chargers. As long as the chargers connect to the 4G network, you can return home and batch configure these chargers through the portal.
- Support for Non-Expert Installers: Some of your installer partners may be skilled at installation but not familiar with app configuration. With the pre-configuration feature, they only need to record the circuit information and send it to you, allowing you to complete the configuration on the portal.
How to pre-configure
- Go to Smart Hub (Beta) > Pre-Configuration.
- You can either create a new location for the chargers or select an existing one that matches your installation. When you add a charger to an existing location or circuit, it will automatically be configured based on those settings.
- In the charger section, you can add one or multiple chargers, all using the same location and circuit settings. Just make sure the serial number (SN) and pin code are correct—if not, you won’t be able to submit.
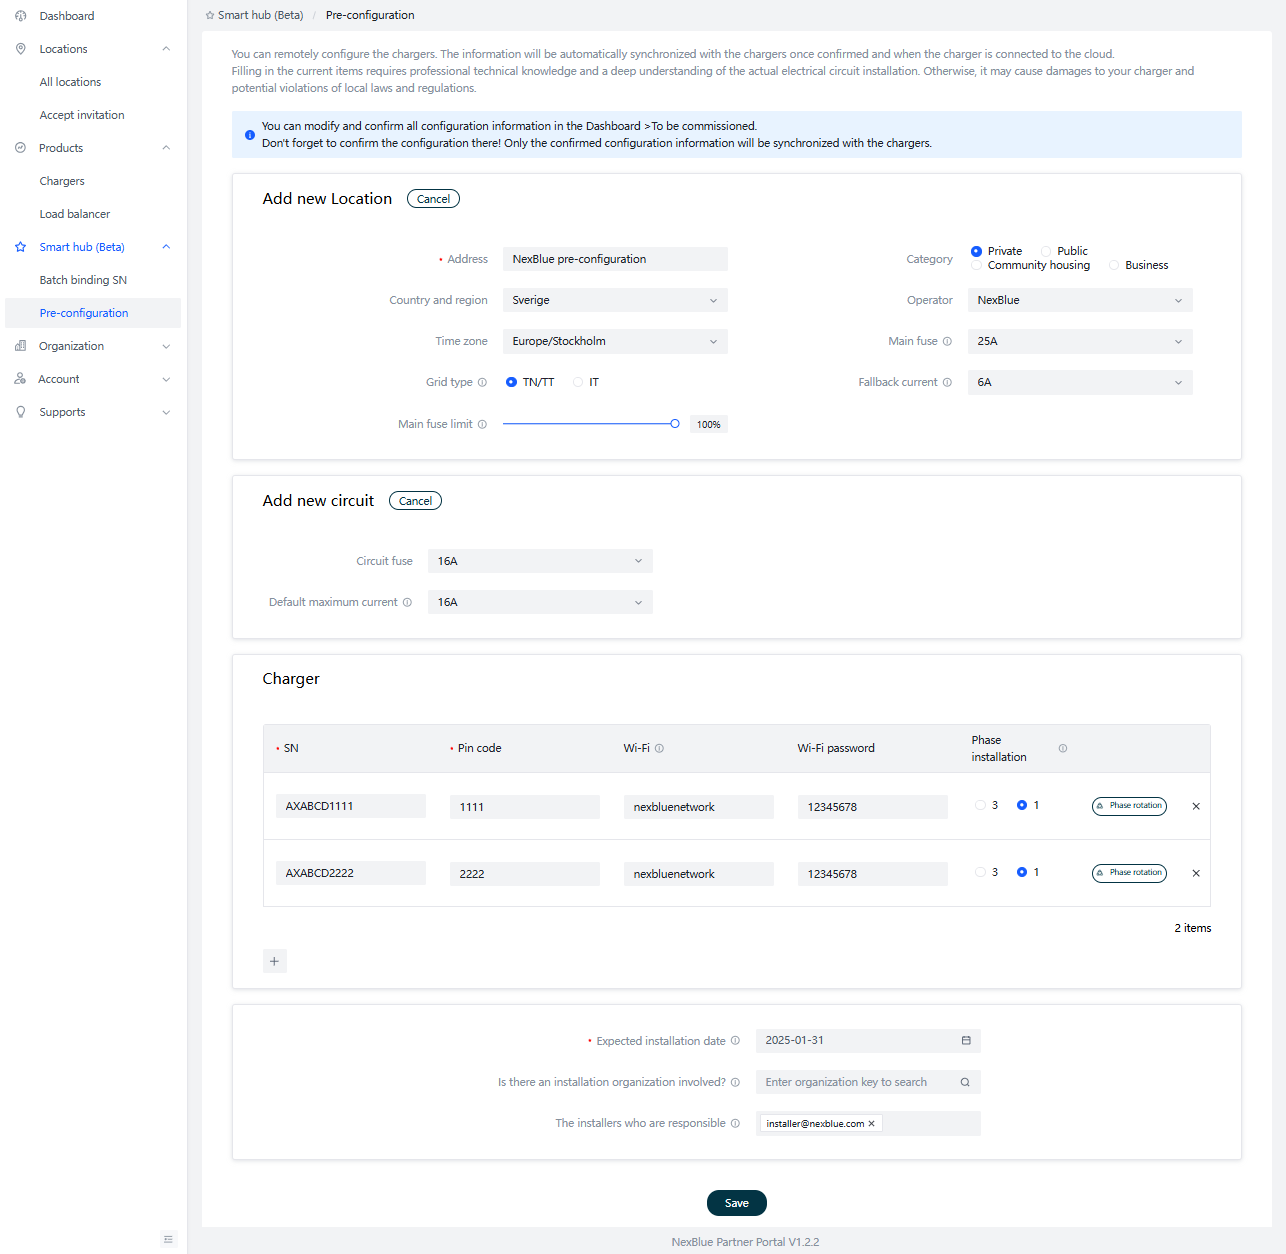
Your organization will automatically gain access to the pre-configuration process and become partners of the location once installed. If you have other partners, such as an external installation company or hired installers, enter their details at the bottom of the page. They will receive email notification to complete the installation, and gain access to manage the pre-configuration process and location.
All information on the page will be saved as a draft, allowing you to modify it before confirmation. Remember to confirm the configuration! Only confirmed information will be synchronized with the chargers. You can modify and confirm all configuration details in the Dashboard > To Be Commissioned.
If there are any issues with confirmed chargers, you can update the information just like you would with already installed chargers.
Finalising the Configuration
To finalise the configuration, two requirements must be met:
- The charger must be installed and successfully connected to the cloud via 4G.
- The configuration must be confirmed.
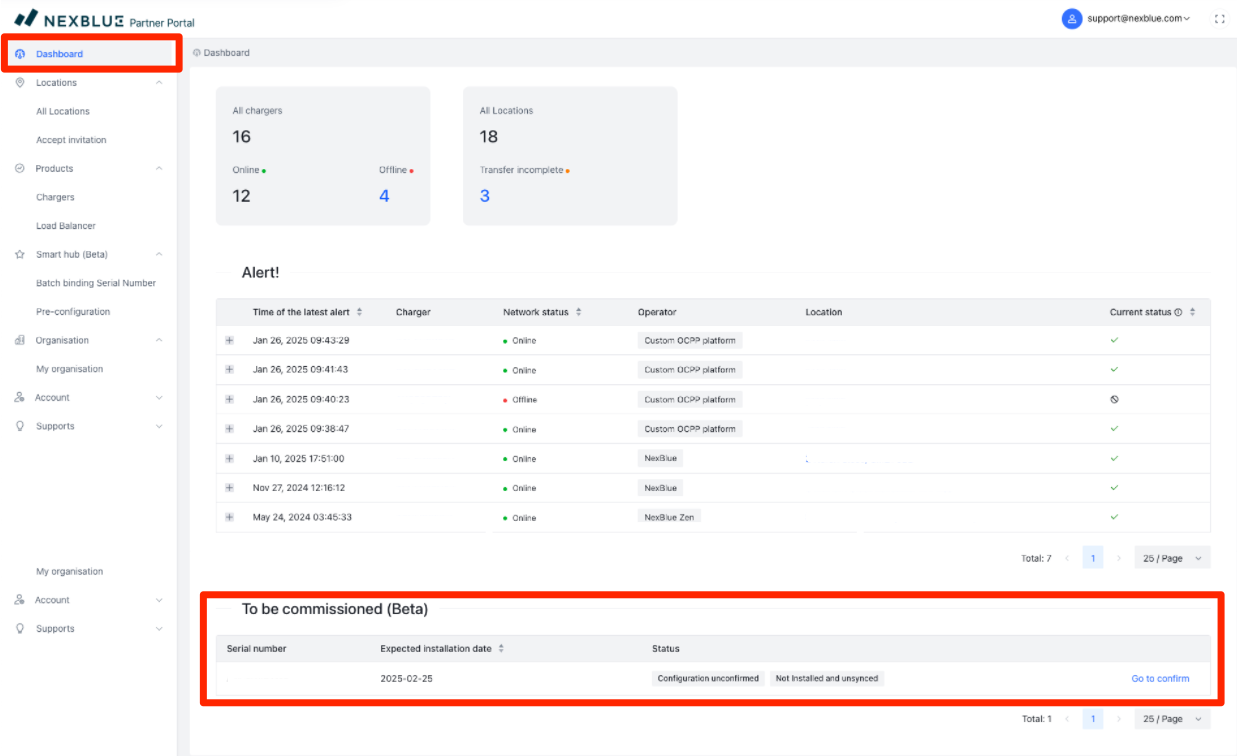
To confirm the configuration and send the data to the charge points included for the location, find the Location at the bottom of the Dashboard, then click "Go to confirm", this must be done through the Partner Portal.
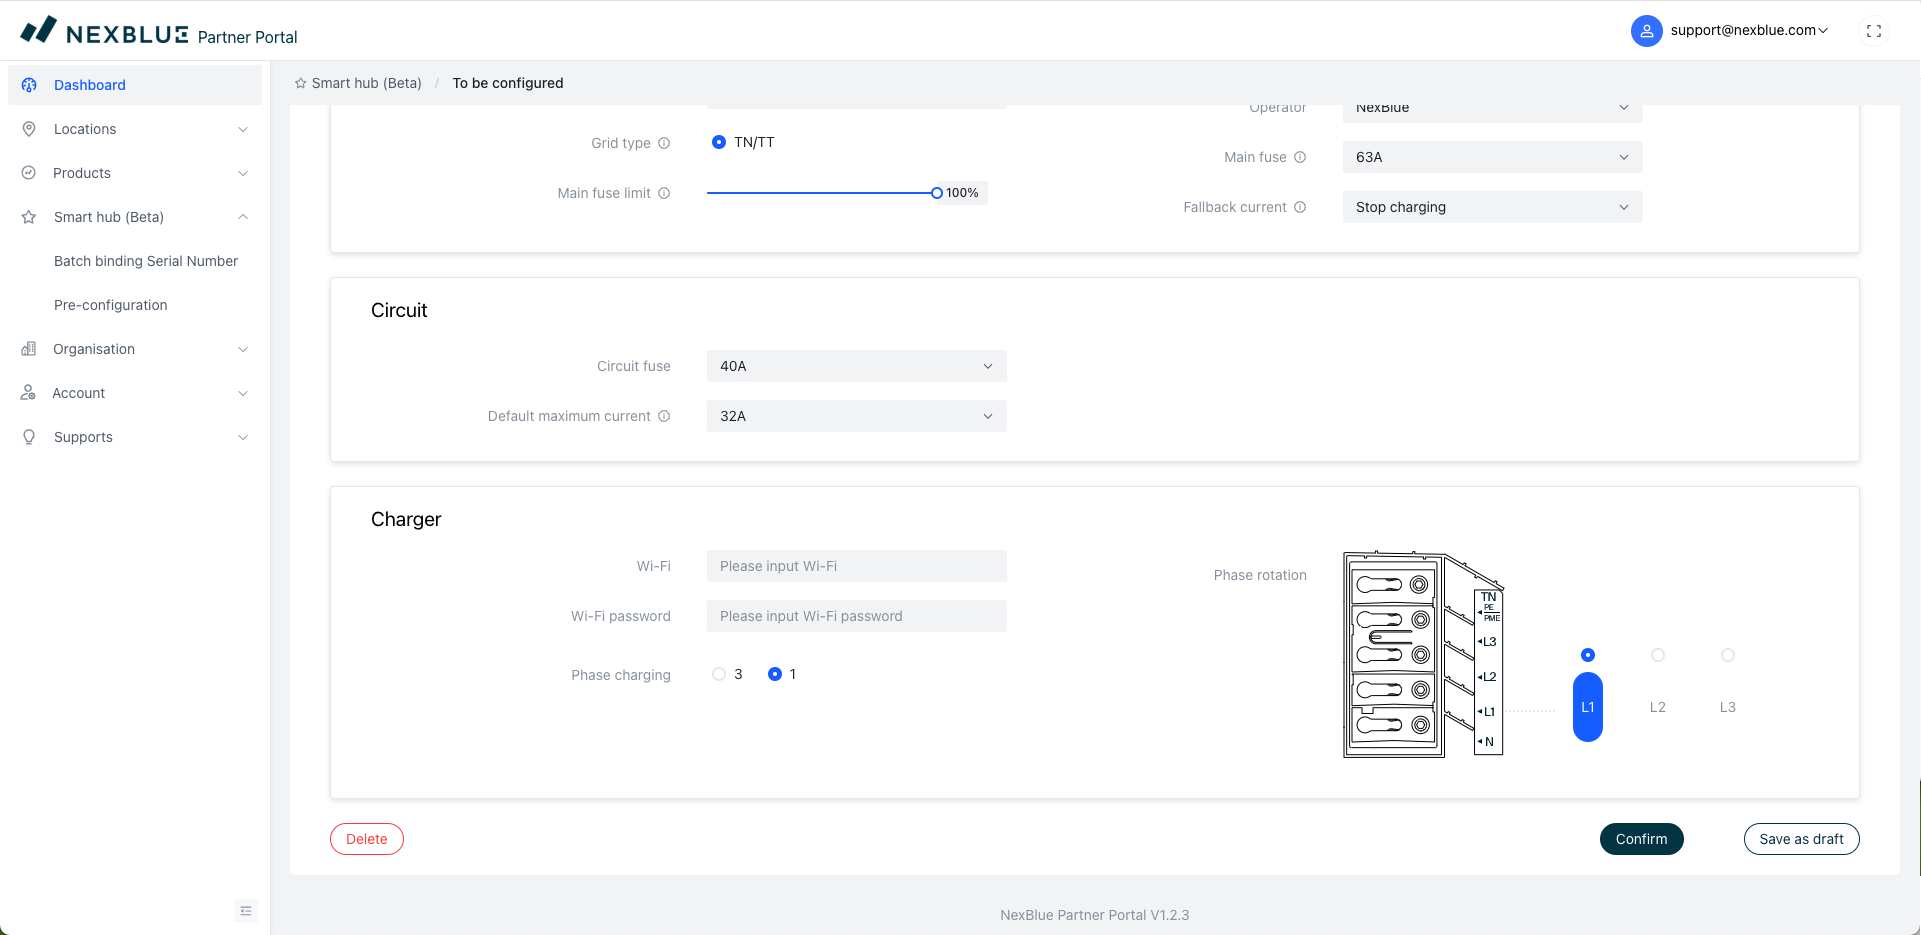
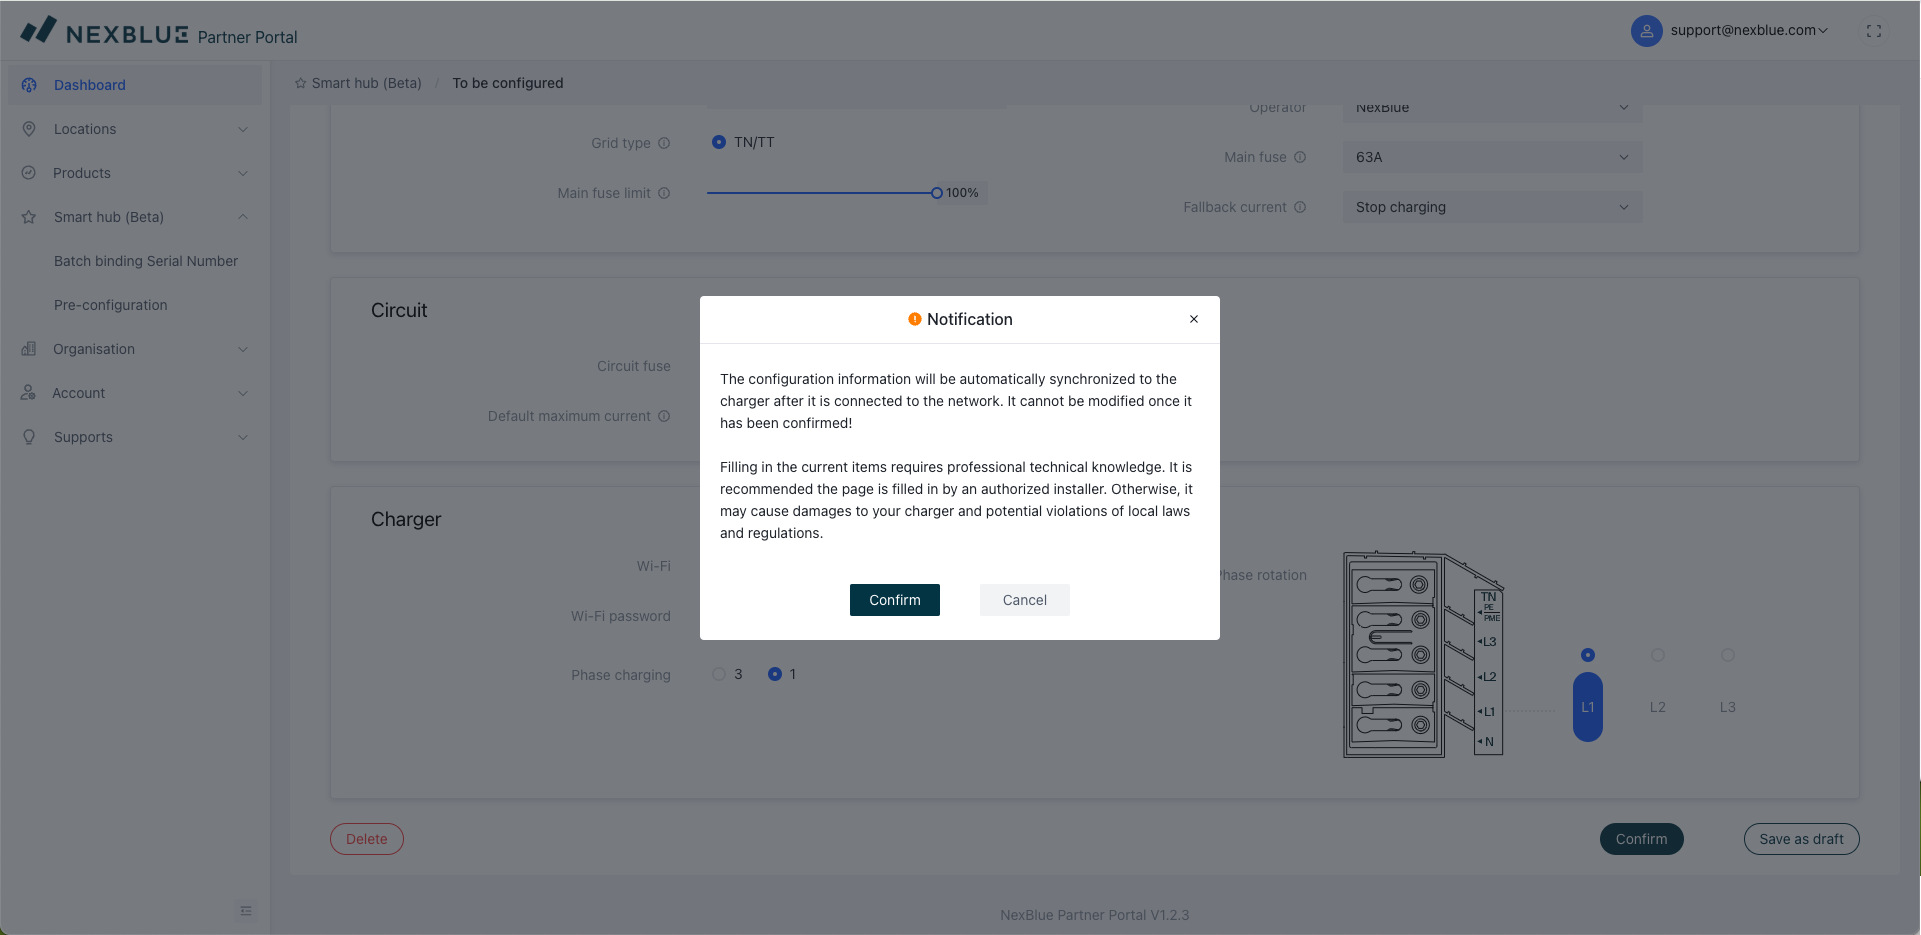
If you are still happy to proceed with the configuration, click "confirm" at the bottom, you will then be presented with a screen detailing information regarding the importance of the information being correct and the potential risks of submitting incorrect information. If you are happy, click "Confirm" for the final time to push through the configuration data. As long as the units have a 4G signal, they will then be attached to the location.
How to transfer ownership
Unlike for pre-configuration, ownership can be transferred either through the NexBlue Partner Portal via this guide. or through the NexBlue Partner App via this guide.
Updated on 18 May 2026