
Hi, how can we help?
- How to transfer a Location between End Users
- Installation Checklist
- Resolving fallback waiting error (for Installers only)
- How to commission a NexBlue Charge Point
- How to connect charge point to 4G during/after installation
- How to create and manage Locations
- What is a Location and why is it important?
- How to transfer ownership to customer (NexBlue Partner App)
- Phase rotation
- Fallback waiting error
- Where is the pin for my charge point/Zen?
- How to make a charge point tethered (lead stays plugged in)
- How to change brightness of charge point light
- How to add a charge point/load balancer to your Location
- How to commission a NexBlue Charge Point
- How to connect charge point to 4G during/after installation
- RCD Test Procedure
- How to check if a product has been encountering any unexpected behavior
- Residual Current Protection
- Phase rotation
- Connect the NexBlue Zen (Load Balancer) to the NexBlue Cloud
- Fallback waiting error
- Where is the pin for my charge point/Zen?
- Resolving fallback waiting error (for Installers only)
- How to add a charge point/load balancer to your Location
- How to use solar energy to charge your car
- How to check if a product has been encountering any unexpected behavior
- How to Connect the NexBlue Zen (Smart Meter) to Wi-Fi
- Integrate solar panel terminal with Load balancer
- How to add a Location thats been shared with you
- Where is the pin for my charge point/Zen?
- How to share a location with an individual/organisation
- How to create/join/invite someone to an Organisation
- How to connect charge point to 4G during/after installation
- How to carry out a factory reset of a product
- How to create and manage Locations
- How to check if a product has been encountering any unexpected behavior
- Charging status
- Phase rotation
- How to transfer ownership to end customer (Partner Portal)
- Pre-configuration: Remotely complete the installation configuration on the portal
- Does every new installer need to get a username and password?
- How to change the main fuse on the Partner Portal?
- How to transfer a Location between End Users
- How to connect a charger to WiFi
- Exporting charging data
- Connect the NexBlue Zen (Load Balancer) to the NexBlue Cloud
- Fallback waiting error
- Where is the pin for my charge point/Zen?
- How to make a charge point tethered (lead stays plugged in)
- How to change brightness of charge point light
- How to add a charge point/load balancer to your Location
- How to connect to your tariff (EcoPilot)
- How to set max charging current
- How to set the charging schedule
- Someone else wants to use my charge point, how can I share it with them?
- How to use solar energy to charge your car
- How to add a charge point in the myNexBlue App
- How to Connect the NexBlue Zen (Smart Meter) to Wi-Fi
- How to configure single phase charging?
- Charger or Load Balancer Not Connecting via Bluetooth
- Firewall Requirements for NexBlue Charge Points
- Resolving fallback waiting error (for Installers only)
- Why have I received an email alert about my charge point(s)?
- My charge point is switched on but the light on the unit is not on
- RCD Test Procedure
- Event List
- How to check if a product has been encountering any unexpected behavior
How to Replace the NexBlue Load Balancer
Table of Contents
Overview
This guide explains how to safely remove your existing NexBlue load balancer and install a new one. Follow each step carefully to ensure proper operation and connectivity with your smart meter and the myNexBlue app.
Before You Begin
- Ensure you have the new load balancer and all included cables.
- Keep your phone nearby for app setup.
- Make sure you have access to your electrical cabinet.
⚠️ Warning: Always handle electrical components carefully. If you are unsure, consult a qualified electrician.
Step 1: Remove the Old Load Balancer from the App
- Open the myNexBlue app.
- Go to Dashboard.
- Select Load Balancer.
- Tap the Settings (gear icon).
- Scroll to the bottom.
- Tap Delete.
Step 2: Remove the Old Load Balancer from Cabinet
- Locate the load balancer inside your electrical cabinet (connected to the smart meter).
- Disconnect the load balancer from the smart meter.
- Remove all cables connected to the old load balancer.
- Take out the old device.
Step 3: Connect the Antenna
- Unpack the new load balancer.
- Locate the two antenna cables.
- Connect both antenna cables to the load balancer.
ℹ️ Note: Both antennas must be connected for optimal performance.
Step 4: Connect the Cables
Inside the package, you will find:
- 3-in-1 cable
- RJ45 cable
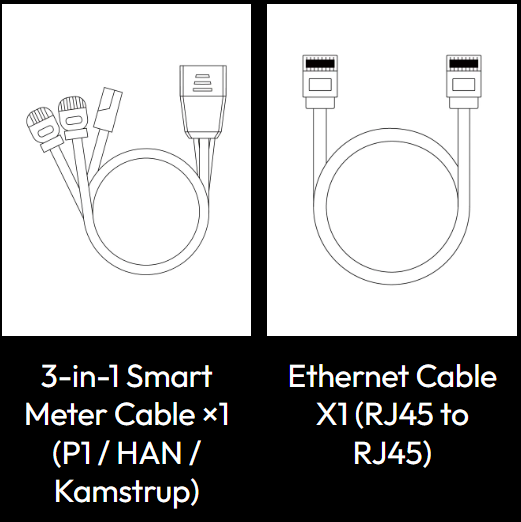
Follow these steps:
- Connect the RJ45 cable to the load balancer.
- Connect the other end of the RJ45 cable to the 3-in-1 cable.
Connection Flow:
Load balancer → RJ45 cable → 3-in-1 cable → Smart meter
Step 5: Connect to the Smart Meter
Choose the correct connector from the 3-in-1 cable based on your smart meter type:
- P1 port: Use the RJ12 plug
- HAN port: Use the RJ45 plug
- Kamstrup meter: Use the KM plug
- Insert the correct connector into the smart meter.
- Wait approximately 1 minute.
✅ The load balancer should power on automatically.
Step 6: Add the New Load Balancer
- Open the myNexBlue app.
- Follow the setup guide:
https://nexblue.com/apps/hc/mynexblue-app/how-to-add-a-charge-pointload-balancer-to-your-location
ℹ️ Important: Keep your phone close to the load balancer during setup.
Troubleshooting
Load Balancer Does Not Turn On
Check the following:
- The correct connector (RJ12, RJ45, or KM) is used for your smart meter.
- All cables are securely connected.
Cannot Add the Device in the App
Ensure:
- Your phone is close to the load balancer.
- The load balancer is powered on.
- Bluetooth and required permissions are enabled on your phone.
FAQs
Q: How long does it take for the load balancer to power on?
A: It should power on within approximately 1 minute after connecting to the smart meter.
Q: Do I need both antenna cables connected?
A: Yes, both antennas must be connected for proper communication.
Q: Can I reuse cables from the old load balancer?
A: No, always use the cables provided with the new load balancer.
Need Help?
If you experience any issues during installation, please contact NexBlue Support.
Once the new load balancer is successfully added, inform support so the connection can be verified.
Updated on 18 May 2026