
Hej, hur kan vi hjälpa dig?
- Hur man överför en plats mellan slutanvändare
- Installationschecklista
- Lösa felet med väntan på reservlösning (endast för installatörer)
- Hur man beställer en Point
- Hur man ansluter laddningsstationen till 4G under/efter installationen
- Hur man skapar och hanterar platser
- Vad är en plats och varför är den viktig?
- Hur man överför äganderätten till kunden (NexBlue App)
- Fasrotation
- Fallback-väntfel
- Var finns stiftet till min laddZen?
- Hur man gör en laddningsstation fast (kabeln förblir ansluten)
- Hur man ändrar ljusstyrkan på laddningspunktens belysning
- Hur du lägger till en laddningsstation/lastbalanserare till din plats
- Hur man beställer en Point
- Hur man ansluter laddningsstationen till 4G under/efter installationen
- RCD-testförfarande
- Hur man kontrollerar om en produkt har uppvisat något oväntat beteende
- Järnströmsskydd
- Fasrotation
- Anslut NexBlue Zen lastbalanserare) till NexBlue
- Fallback-väntfel
- Var finns stiftet till min laddZen?
- Lösa felet med väntan på reservlösning (endast för installatörer)
- Hur du lägger till en laddningsstation/lastbalanserare till din plats
- Hur man använder solenergi för att ladda sin bil
- Hur man kontrollerar om en produkt har uppvisat något oväntat beteende
- Hur man ansluter NexBlue Zen smart mätare) till Wi-Fi
- Integrera solpanelsterminal med lastbalanserare
- Hur man lägger till en plats som har delats med dig
- Var finns stiftet till min laddZen?
- Hur man delar en plats med en person/organisation
- Hur man skapar/går med i/bjuder in någon till en organisation
- Hur man ansluter laddningsstationen till 4G under/efter installationen
- Hur man återställer en produkt till fabriksinställningarna
- Hur man skapar och hanterar platser
- Hur man kontrollerar om en produkt har uppvisat något oväntat beteende
- Laddningsstatus
- Fasrotation
- Hur man överför äganderätten till slutkunden (partnerportal)
- Förkonfiguration: Slutför installationskonfigurationen på distans via portalen.
- Måste varje ny installatör skaffa ett användarnamn och lösenord?
- Hur byter man huvudsäkringsdonet på Partnerportalen?
- Hur man överför en plats mellan slutanvändare
- Hur man ansluter en laddare till WiFi
- Exportera laddningsdata
- Anslut NexBlue Zen lastbalanserare) till NexBlue
- Fallback-väntfel
- Var finns stiftet till min laddZen?
- Hur man gör en laddningsstation fast (kabeln förblir ansluten)
- Hur man ändrar ljusstyrkan på laddningspunktens belysning
- Hur du lägger till en laddningsstation/lastbalanserare till din plats
- Hur du ansluter till din tariff (EcoPilot)
- Hur man ställer in maximal laddningsström
- Hur man ställer in laddningsschemat
- Någon annan vill använda min laddningsstation, hur kan jag dela den med dem?
- Hur man använder solenergi för att ladda sin bil
- Hur man lägger till en laddningsstation i myNexBlue-appen
- Hur man ansluter NexBlue Zen smart mätare) till Wi-Fi
- Hur konfigurerar man enfaslad laddning?
- Laddaren eller lastbalanseraren ansluter inte via Bluetooth
- Brandväggskrav för NexBlue
- Lösa felet med väntan på reservlösning (endast för installatörer)
- Varför har jag fått ett e-postmeddelande om min laddningsstation?
- Min laddningsstation är påslagen men lampan på enheten lyser inte.
- RCD-testförfarande
- Evenemangslista
- Hur man kontrollerar om en produkt har uppvisat något oväntat beteende
Förkonfiguration: Slutför installationskonfigurationen på distans via portalen.
Innehållsförteckning
Denna funktion är exklusiv för organisationsmedlemmar. Om du inte hittar förkonfigurationen i menyn, kontrollera att ditt konto har godkänts för organisationsbehörighet.
Vilka scenarier är förkonfigurationen förberedd för?
- Installation av flera laddare: Tänk dig att du får en order på att installera 20 laddare. Det innebär att du kommer att lägga mycket tid på installation och konfiguration. Med förkonfigurationsfunktionen kan du gå efter att du har slutfört installationen och startat laddarna. Så länge laddarna är anslutna till 4G-nätverket kan du åka hem och konfigurera laddarna i batch via portalen.
- Stöd för icke-expertinstallatörer: Vissa av dina installationspartner kan vara skickliga på installation men inte så bekanta med appkonfiguration. Med förkonfigurationsfunktionen behöver de bara registrera kretsinformationen och skicka den till dig, så att du kan slutföra konfigurationen på portalen.
Hur man förkonfigurerar
- Gå till Smart Hub (Beta) > Förkonfiguration.
- Du kan antingen skapa en ny plats för laddarna eller välja en befintlig plats som passar din installation. När du lägger till en laddare till en befintlig plats eller krets konfigureras den automatiskt utifrån dessa inställningar.
- I laddarsektionen kan du lägga till en eller flera laddare, alla med samma plats- och kretsinställningar. Se bara till att serienumret (SN) och pinkoden är korrekta – annars kan du inte skicka in uppgifterna.
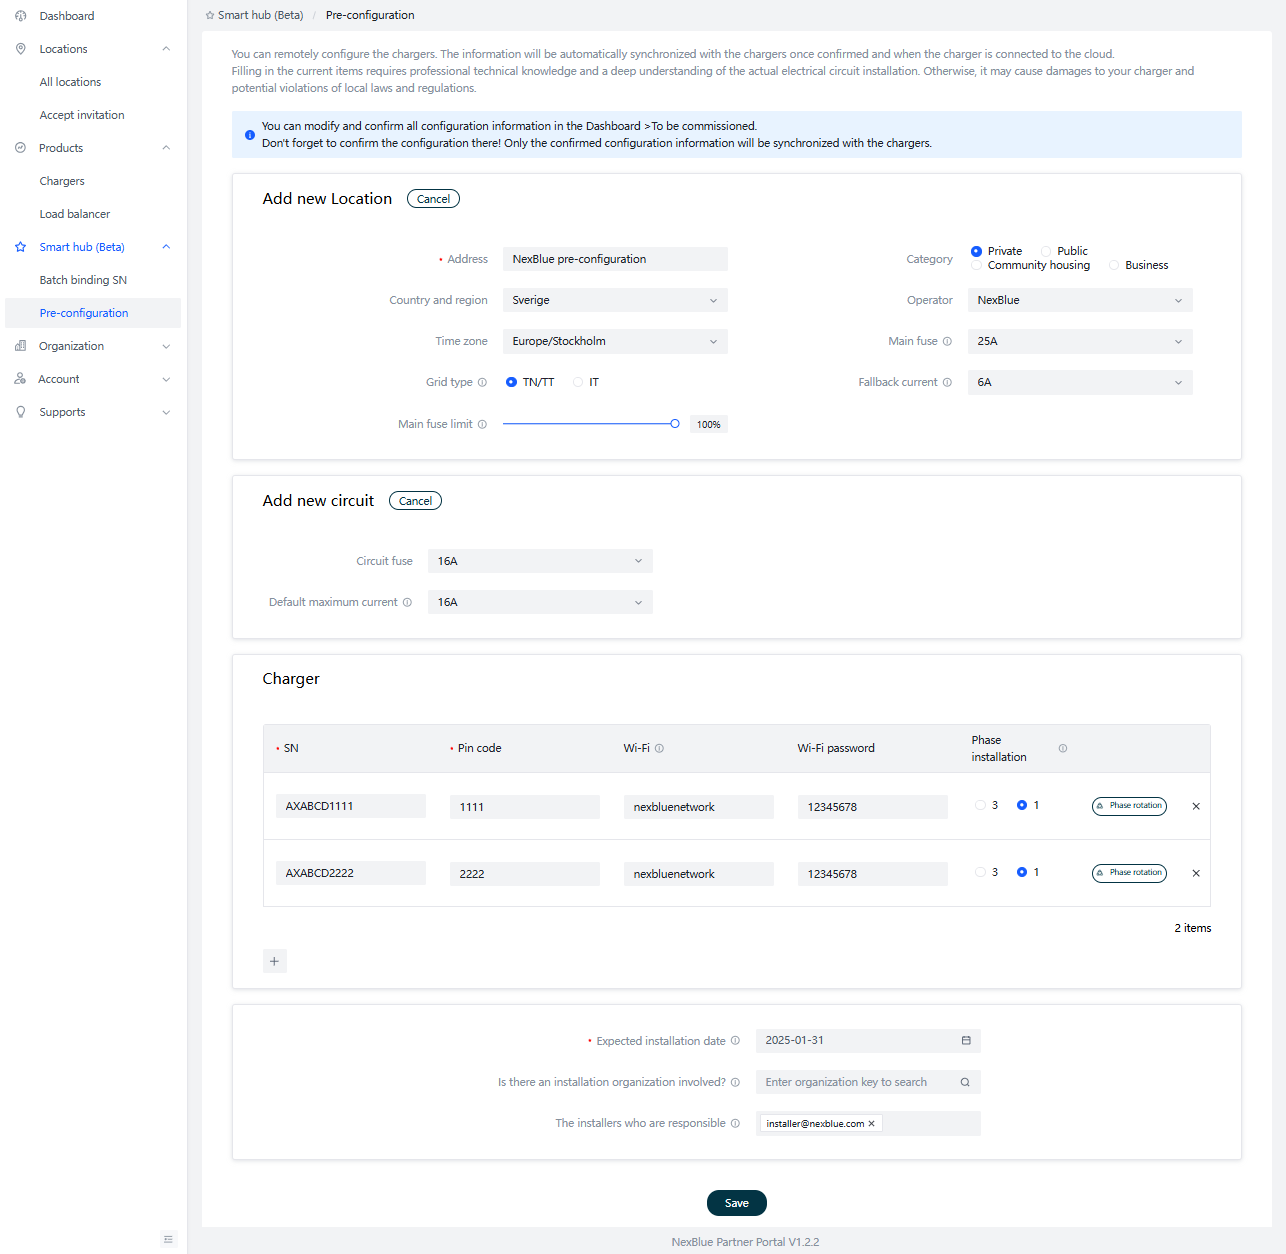
Din organisation får automatiskt tillgång till förkonfigurationsprocessen och blir partner till platsen när installationen är klar. Om du har andra partners, till exempel ett externt installationsföretag eller anlitade installatörer, anger du deras uppgifter längst ner på sidan. De får ett e-postmeddelande om att slutföra installationen och får tillgång till att hantera förkonfigurationsprocessen och platsen.
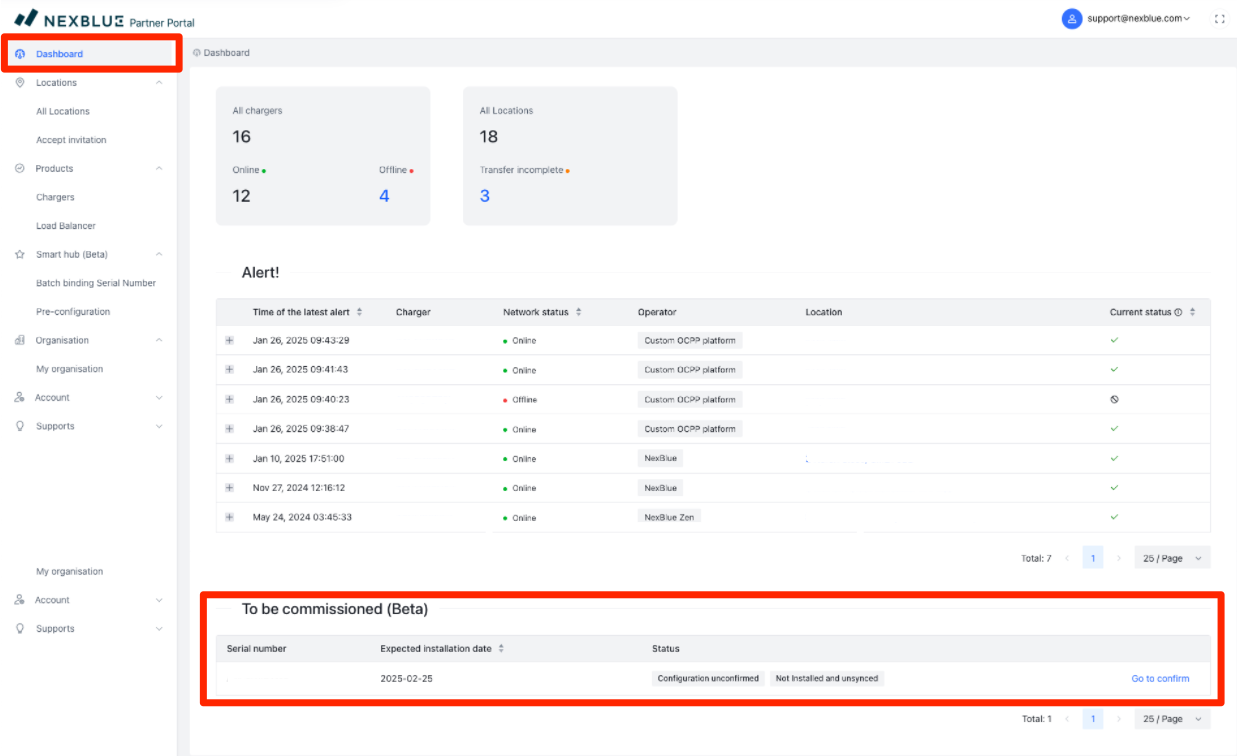
All information på sidan sparas som ett utkast, så att du kan ändra den innan du bekräftar. Kom ihåg att bekräfta konfigurationen! Endast bekräftad information synkroniseras med laddarna. Du kan ändra och bekräfta alla konfigurationsdetaljer i Dashboard > To Be Commissioned.
Om det finns några problem med bekräftade laddare kan du uppdatera informationen på samma sätt som för redan installerade laddare.
Slutföra konfigurationen
För att slutföra konfigurationen måste två krav uppfyllas:
- Laddaren måste vara installerad och ansluten till molnet via 4G.
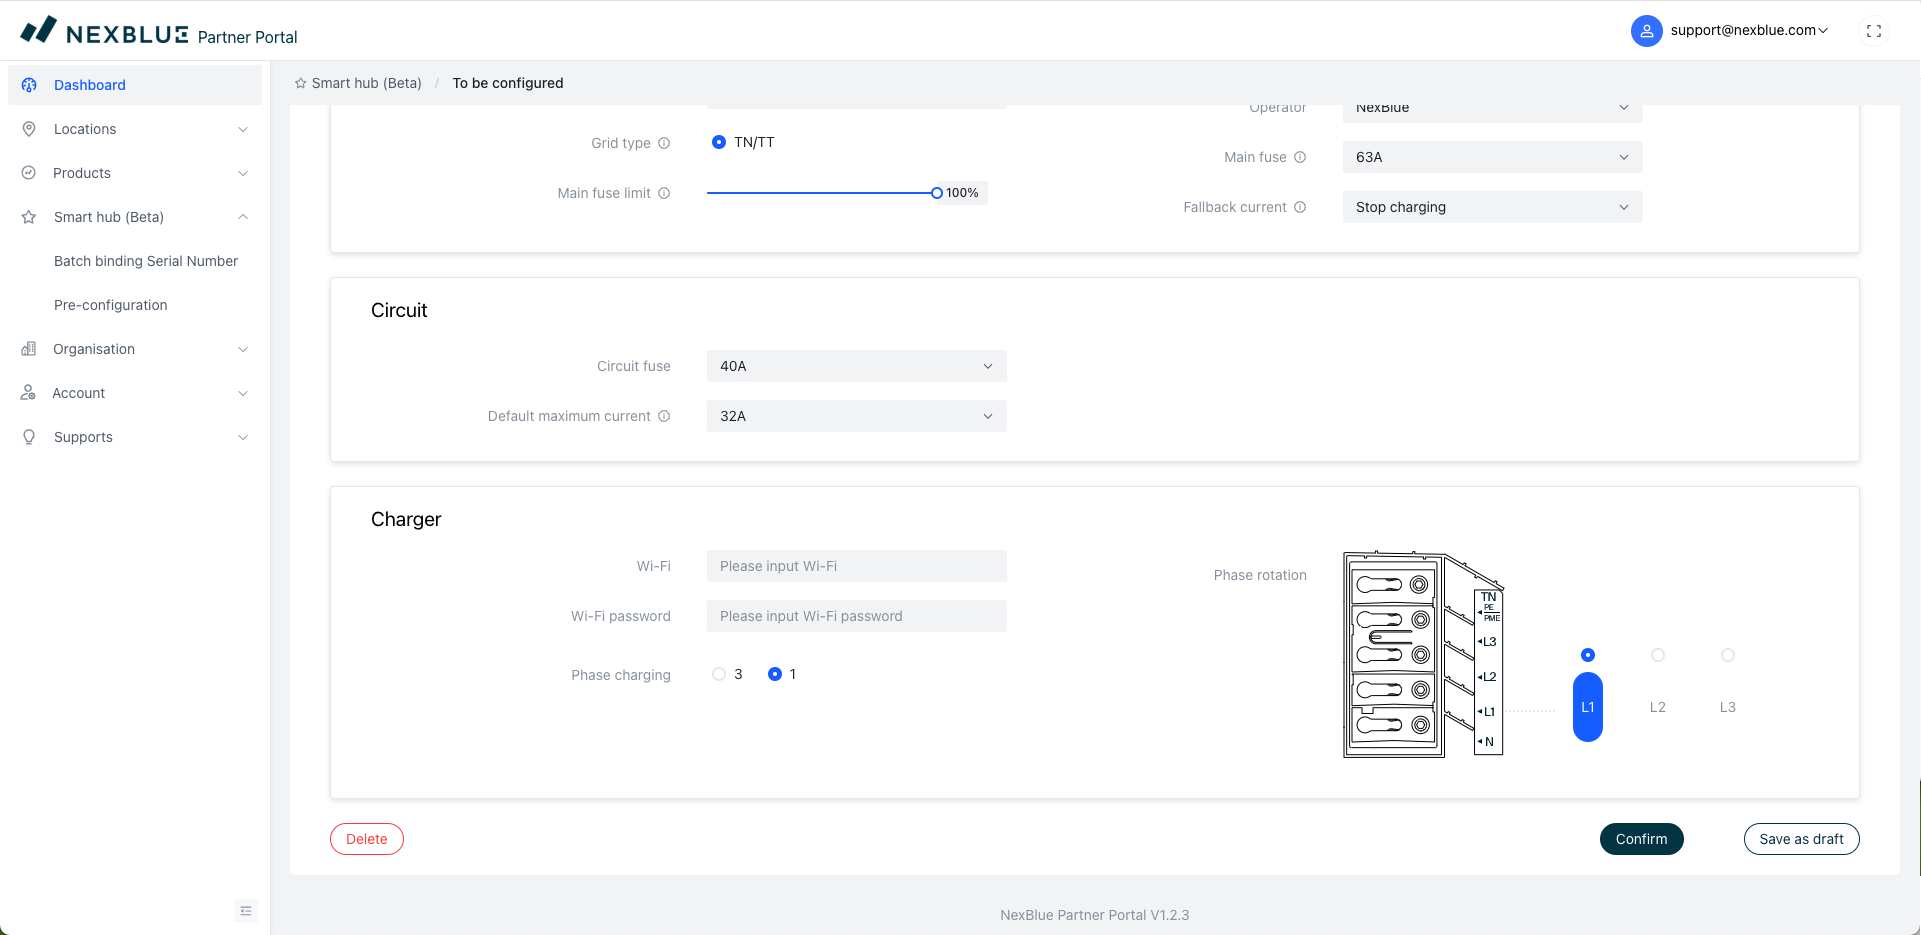
- Konfigurationen måste bekräftas.
För att bekräfta konfigurationen och skicka data till de laddstationer som ingår för platsen, leta upp platsen längst ner på instrumentpanelen och klicka sedan på "Gå för att bekräfta". Detta måste göras via partnerportalen.
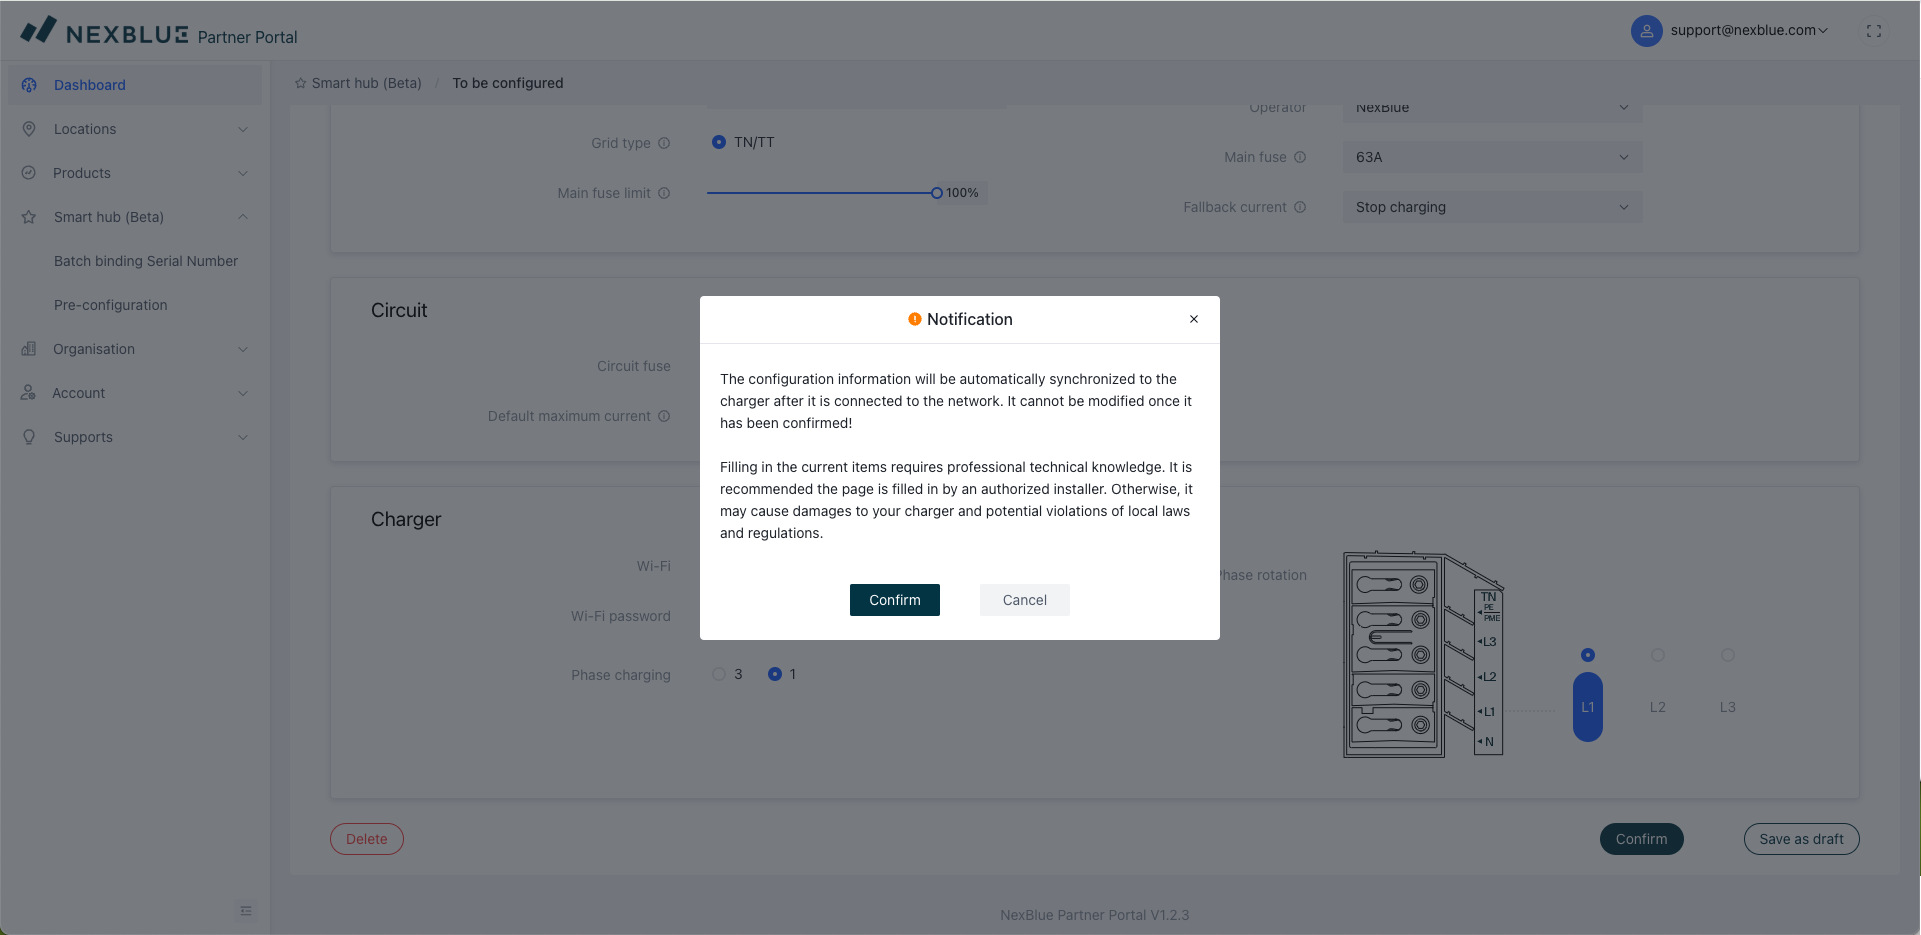
Om du fortfarande vill fortsätta med konfigurationen klickar du på "bekräfta" längst ned. Du kommer då att se en skärm med detaljerad information om vikten av att uppgifterna är korrekta och de potentiella riskerna med att skicka in felaktiga uppgifter. Om du är nöjd klickar du på "Bekräfta" en sista gång för att skicka konfigurationsuppgifterna. Så länge enheterna har 4G-signal kommer de att kopplas till platsen.
Hur man överför äganderätten
Till skillnad från förkonfigurationen kan äganderätten överföras antingen via NexBlue Portal med hjälp av denna guide. eller via NexBlue App via denna guide.
Uppdaterad den 18 maj 2026