
Hej, hvordan kan vi hjælpe?
- Sådan overføres en placering mellem slutbrugere
- Installationscheckliste
- Løsning af fejl ved ventetid ved tilbagefald (kun for installatører)
- Sådan bestiller du en Point
- Sådan tilsluttes ladestationen til 4G under/efter installationen
- Sådan oprettes og administreres placeringer
- Hvad er en placering, og hvorfor er den vigtig?
- Sådan overføres ejerskabet til kunden (NexBlue App)
- Fasevridning
- Ventetid for fejl
- Hvor er stikket til min ladZen?
- Sådan gør du en ladestation fast tilsluttet (ledningen forbliver tilsluttet)
- Sådan ændres lysstyrken på ladestationens lys
- Sådan tilføjer du et opladningspunkt/en belastningsbalancer til din placering
- Sådan bestiller du en Point
- Sådan tilsluttes ladestationen til 4G under/efter installationen
- RCD-testprocedure
- Sådan kontrolleres det, om et produkt har udvist uventet adfærd
- Reststrømsbeskyttelse
- Fasevridning
- Tilslut NexBlue Zen Load Balancer) til NexBlue
- Ventetid for fejl
- Hvor er stikket til min ladZen?
- Løsning af fejl ved ventetid ved tilbagefald (kun for installatører)
- Sådan tilføjer du et opladningspunkt/en belastningsbalancer til din placering
- Sådan bruger du solenergi til at oplade din bil
- Sådan kontrolleres det, om et produkt har udvist uventet adfærd
- Sådan tilsluttes NexBlue Zen smart måler) til Wi-Fi
- Integrer solcellepanelterminal med belastningsbalancer
- Sådan tilføjer du en placering, der er blevet delt med dig
- Hvor er stikket til min ladZen?
- Sådan deler du en placering med en person/organisation
- Sådan opretter/tilmelder du dig/inviterer nogen til en organisation
- Sådan tilsluttes ladestationen til 4G under/efter installationen
- Sådan udfører du en fabriksindstilling af et produkt
- Sådan oprettes og administreres placeringer
- Sådan kontrolleres det, om et produkt har udvist uventet adfærd
- Opladningsstatus
- Fasevridning
- Sådan overføres ejerskabet til slutkunden (Partnerportal)
- Forudgående konfiguration: Fjernbetjent færdiggørelse af installationskonfigurationen på portalen
- Skal alle nye installatører have et brugernavn og en adgangskode?
- Hvordan skifter man hovedsikringen på Partnerportalen?
- Sådan overføres en placering mellem slutbrugere
- Sådan tilsluttes en oplader til WiFi
- Eksport af opladningsdata
- Tilslut NexBlue Zen Load Balancer) til NexBlue
- Ventetid for fejl
- Hvor er stikket til min ladZen?
- Sådan gør du en ladestation fast tilsluttet (ledningen forbliver tilsluttet)
- Sådan ændres lysstyrken på ladestationens lys
- Sådan tilføjer du et opladningspunkt/en belastningsbalancer til din placering
- Sådan opretter du forbindelse til din takst (EcoPilot)
- Sådan indstilles maksimal ladestrøm
- Sådan indstilles opladningsplanen
- En anden person ønsker at benytte min ladestation. Hvordan kan jeg dele den med vedkommende?
- Sådan bruger du solenergi til at oplade din bil
- Sådan tilføjer du et ladested i myNexBlue-appen
- Sådan tilsluttes NexBlue Zen smart måler) til Wi-Fi
- Hvordan konfigureres enfaset opladning?
- Opladeren eller load balanceren opretter ikke forbindelse via Bluetooth
- Firewallkrav til NexBlue Ladepunkter
- Løsning af fejl ved ventetid ved tilbagefald (kun for installatører)
- Hvorfor har jeg modtaget en e-mail-advarsel om min(e) ladestation(er)?
- Min ladestation er tændt, men lyset på enheden er ikke tændt.
- RCD-testprocedure
- Begivenhedsliste
- Sådan kontrolleres det, om et produkt har udvist uventet adfærd
Sådan deler du en placering med en person/organisation
Indholdsfortegnelse
Organisationer er blevet designet i NexBlue for at gøre det muligt for partnere, der installerer NexBlue , at centralisere styringen af ladestationer via partnerportalen, i stedet for at hver enkelt installatør er ansvarlig for sine egne ladestationer og lokationer.
Dette er let at administrere, når alle medlemmer af organisationen skal have synlighed for alle installationer, der er udført af andre medlemmer, f.eks. et installationsfirma med flere installatører med firma-e-mailadresser, hvorunder alle installationer skal være synlige for organisationen. Nogle gange er det dog vigtigt at kunne dele en enkelt placering med en anden person eller organisation, f.eks. hvis en entreprenør har udført en installation på vegne af en distributør af vedvarende energi, men distributøren er CPO'en.
En placering kan deles med en person eller en organisation. Denne vejledning viser dig, hvordan du gør begge dele. Når en placering er delt, vises den på listen over placeringer på nøjagtig samme måde, som hvis personen eller organisationen selv havde installeret den.
Sådan deler du via e-mail (individuel)
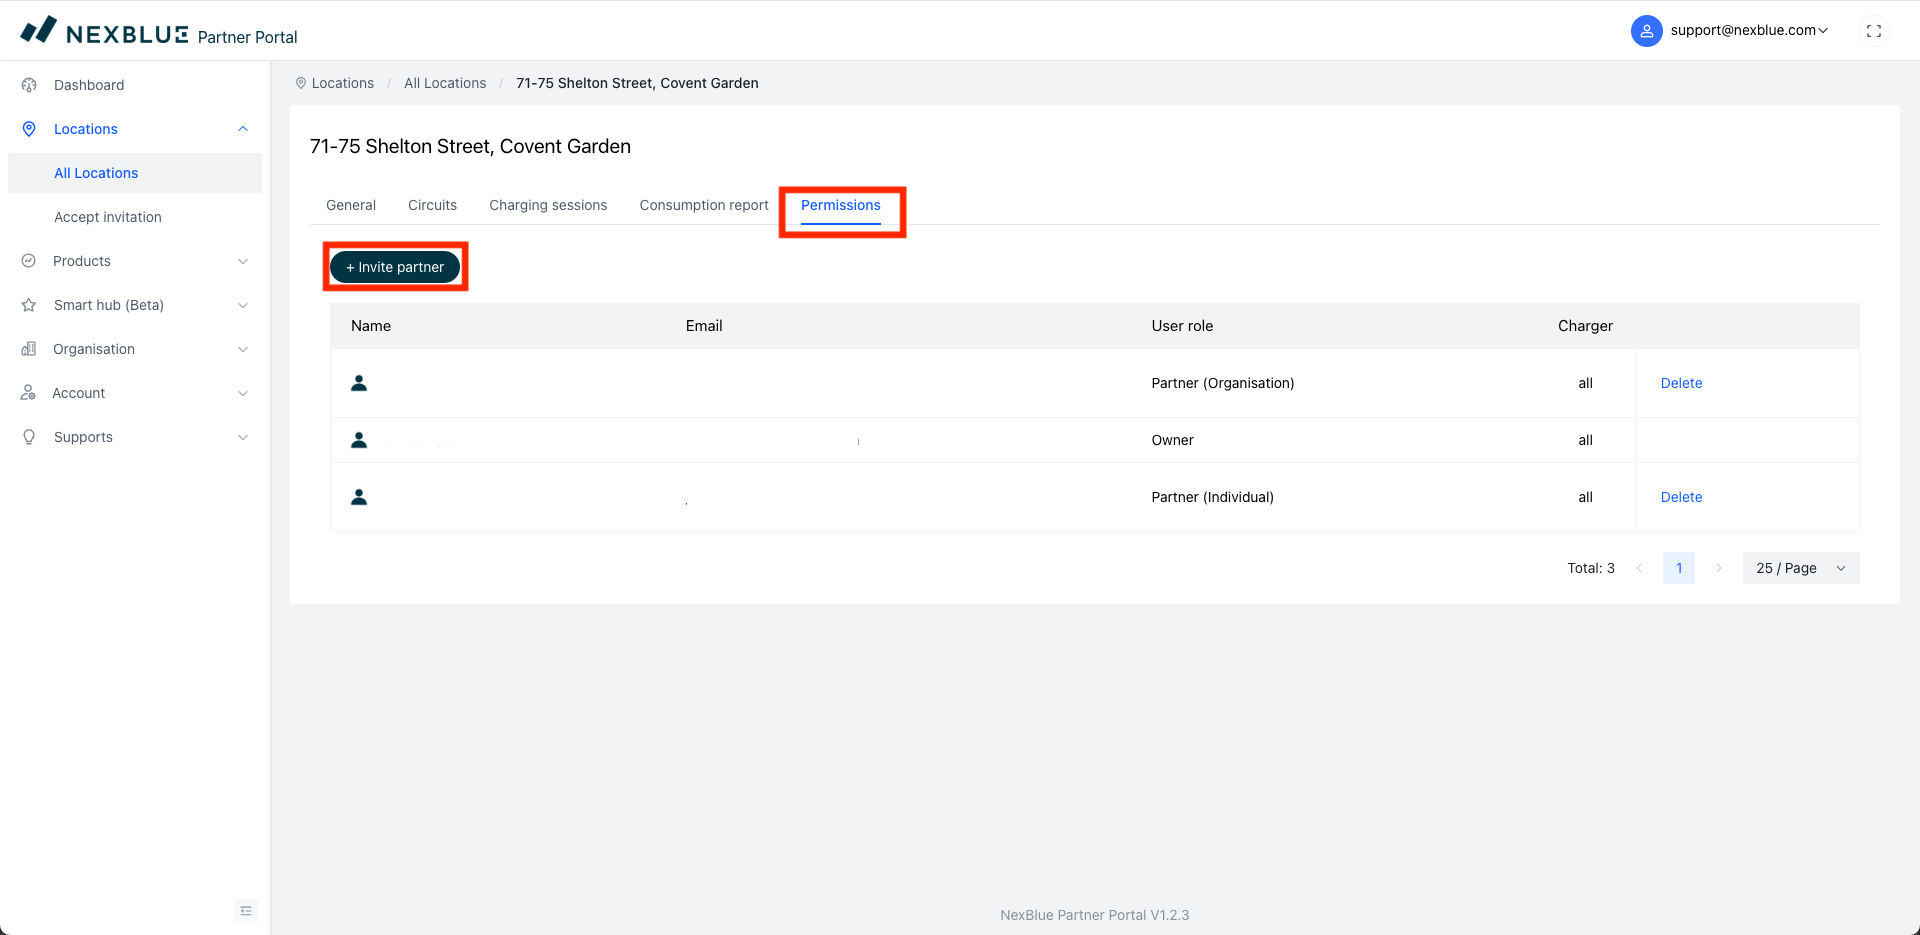
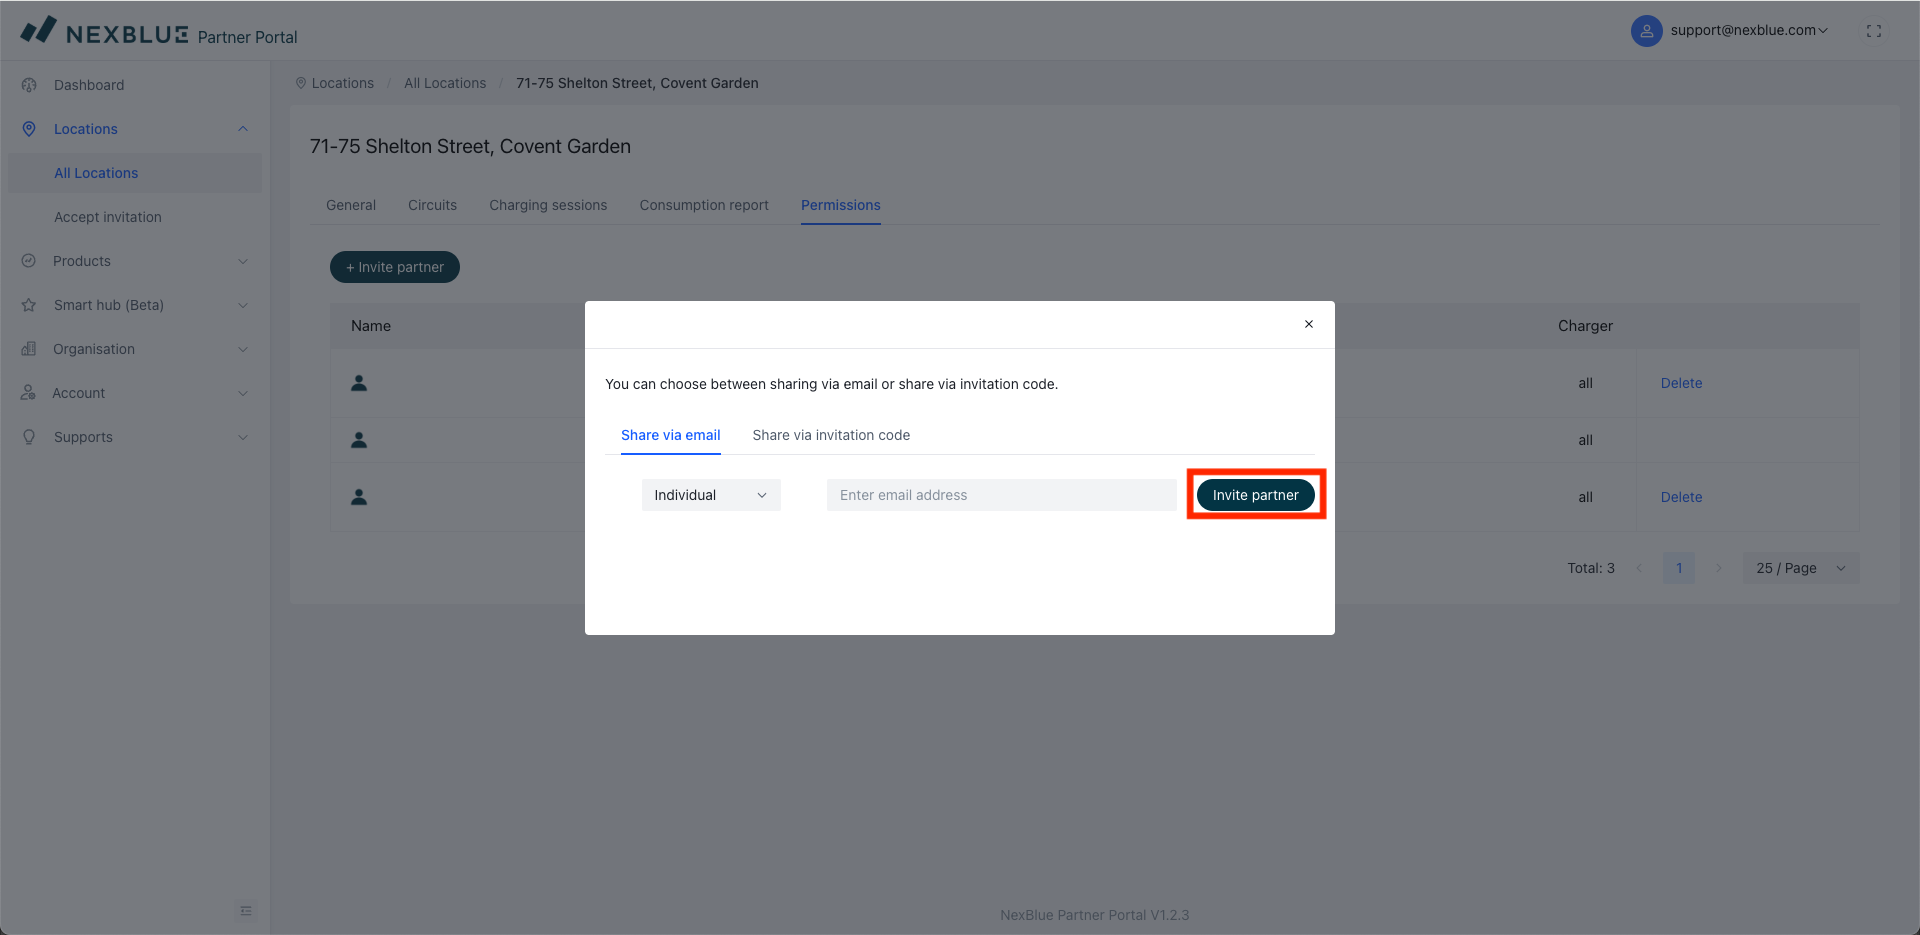
Find den placering, du ønsker at dele, og gå derefter til fanen "Tilladelser". Her kan du se, hvem der allerede har adgang til placeringen, herunder ejeren (kunden) og andre brugere i din organisation. Klik på "Inviter partner" og sørg for, at personen er valgt i rullemenuen. Indtast e-mailadressen på den person, du ønsker at dele placeringen med. Personen vil derefter modtage en e-mail med instruktioner om, hvordan placeringen tilføjes til vedkommendes portalvisning.
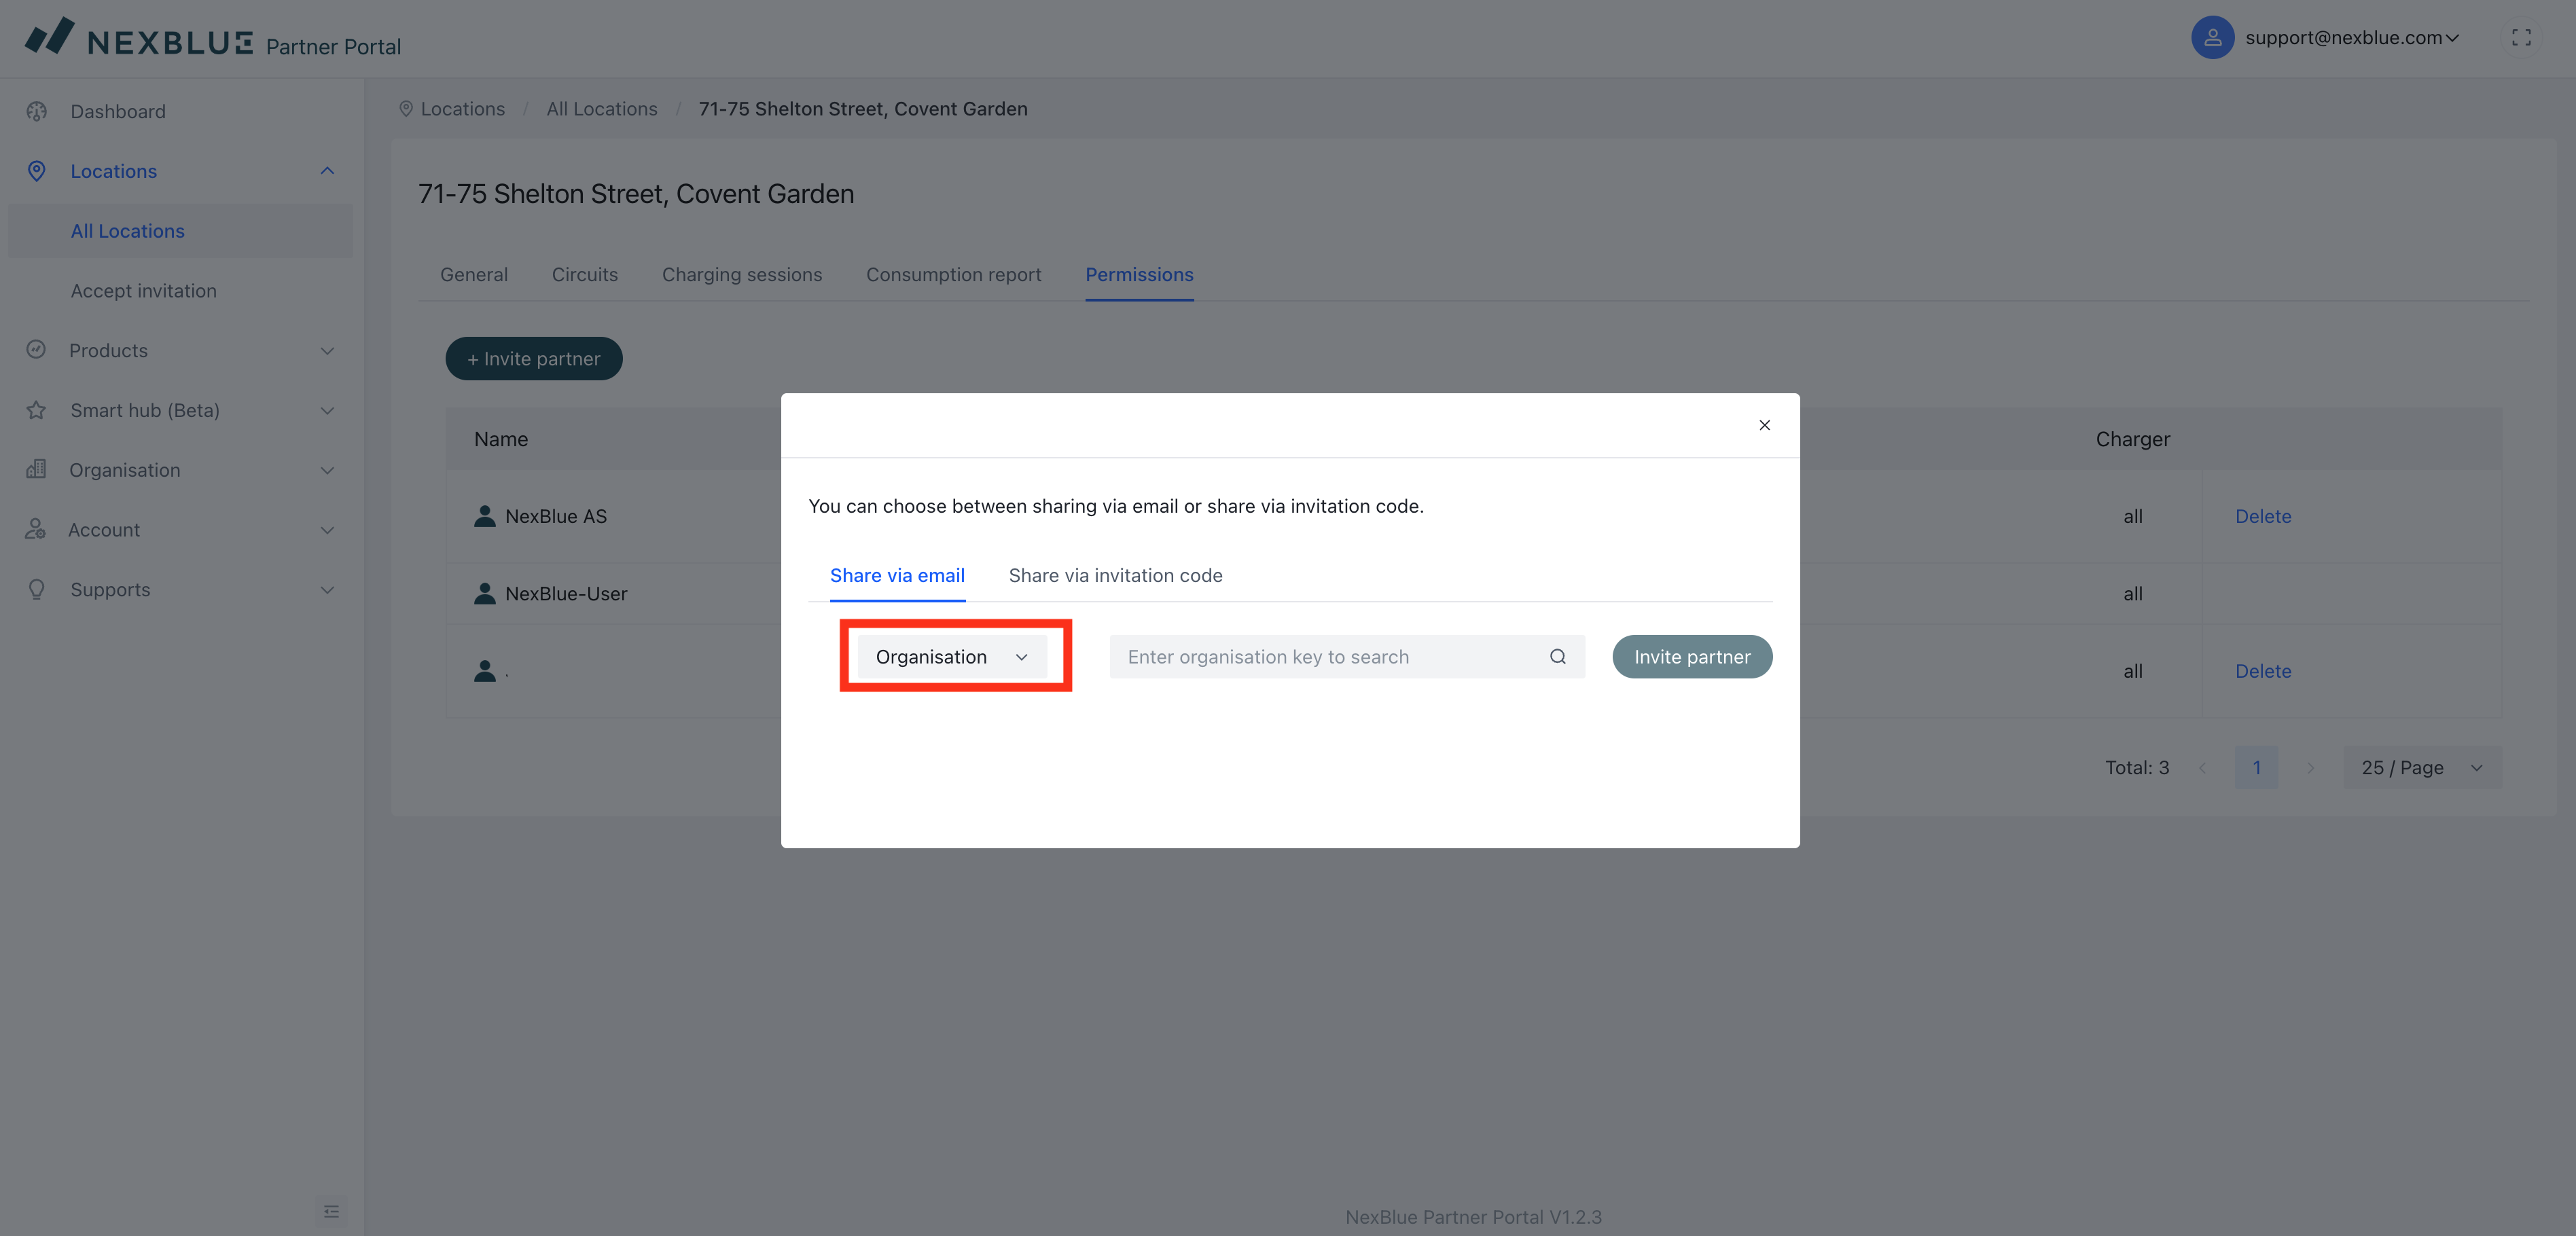
Sådan deler du via e-mail (Organisation)
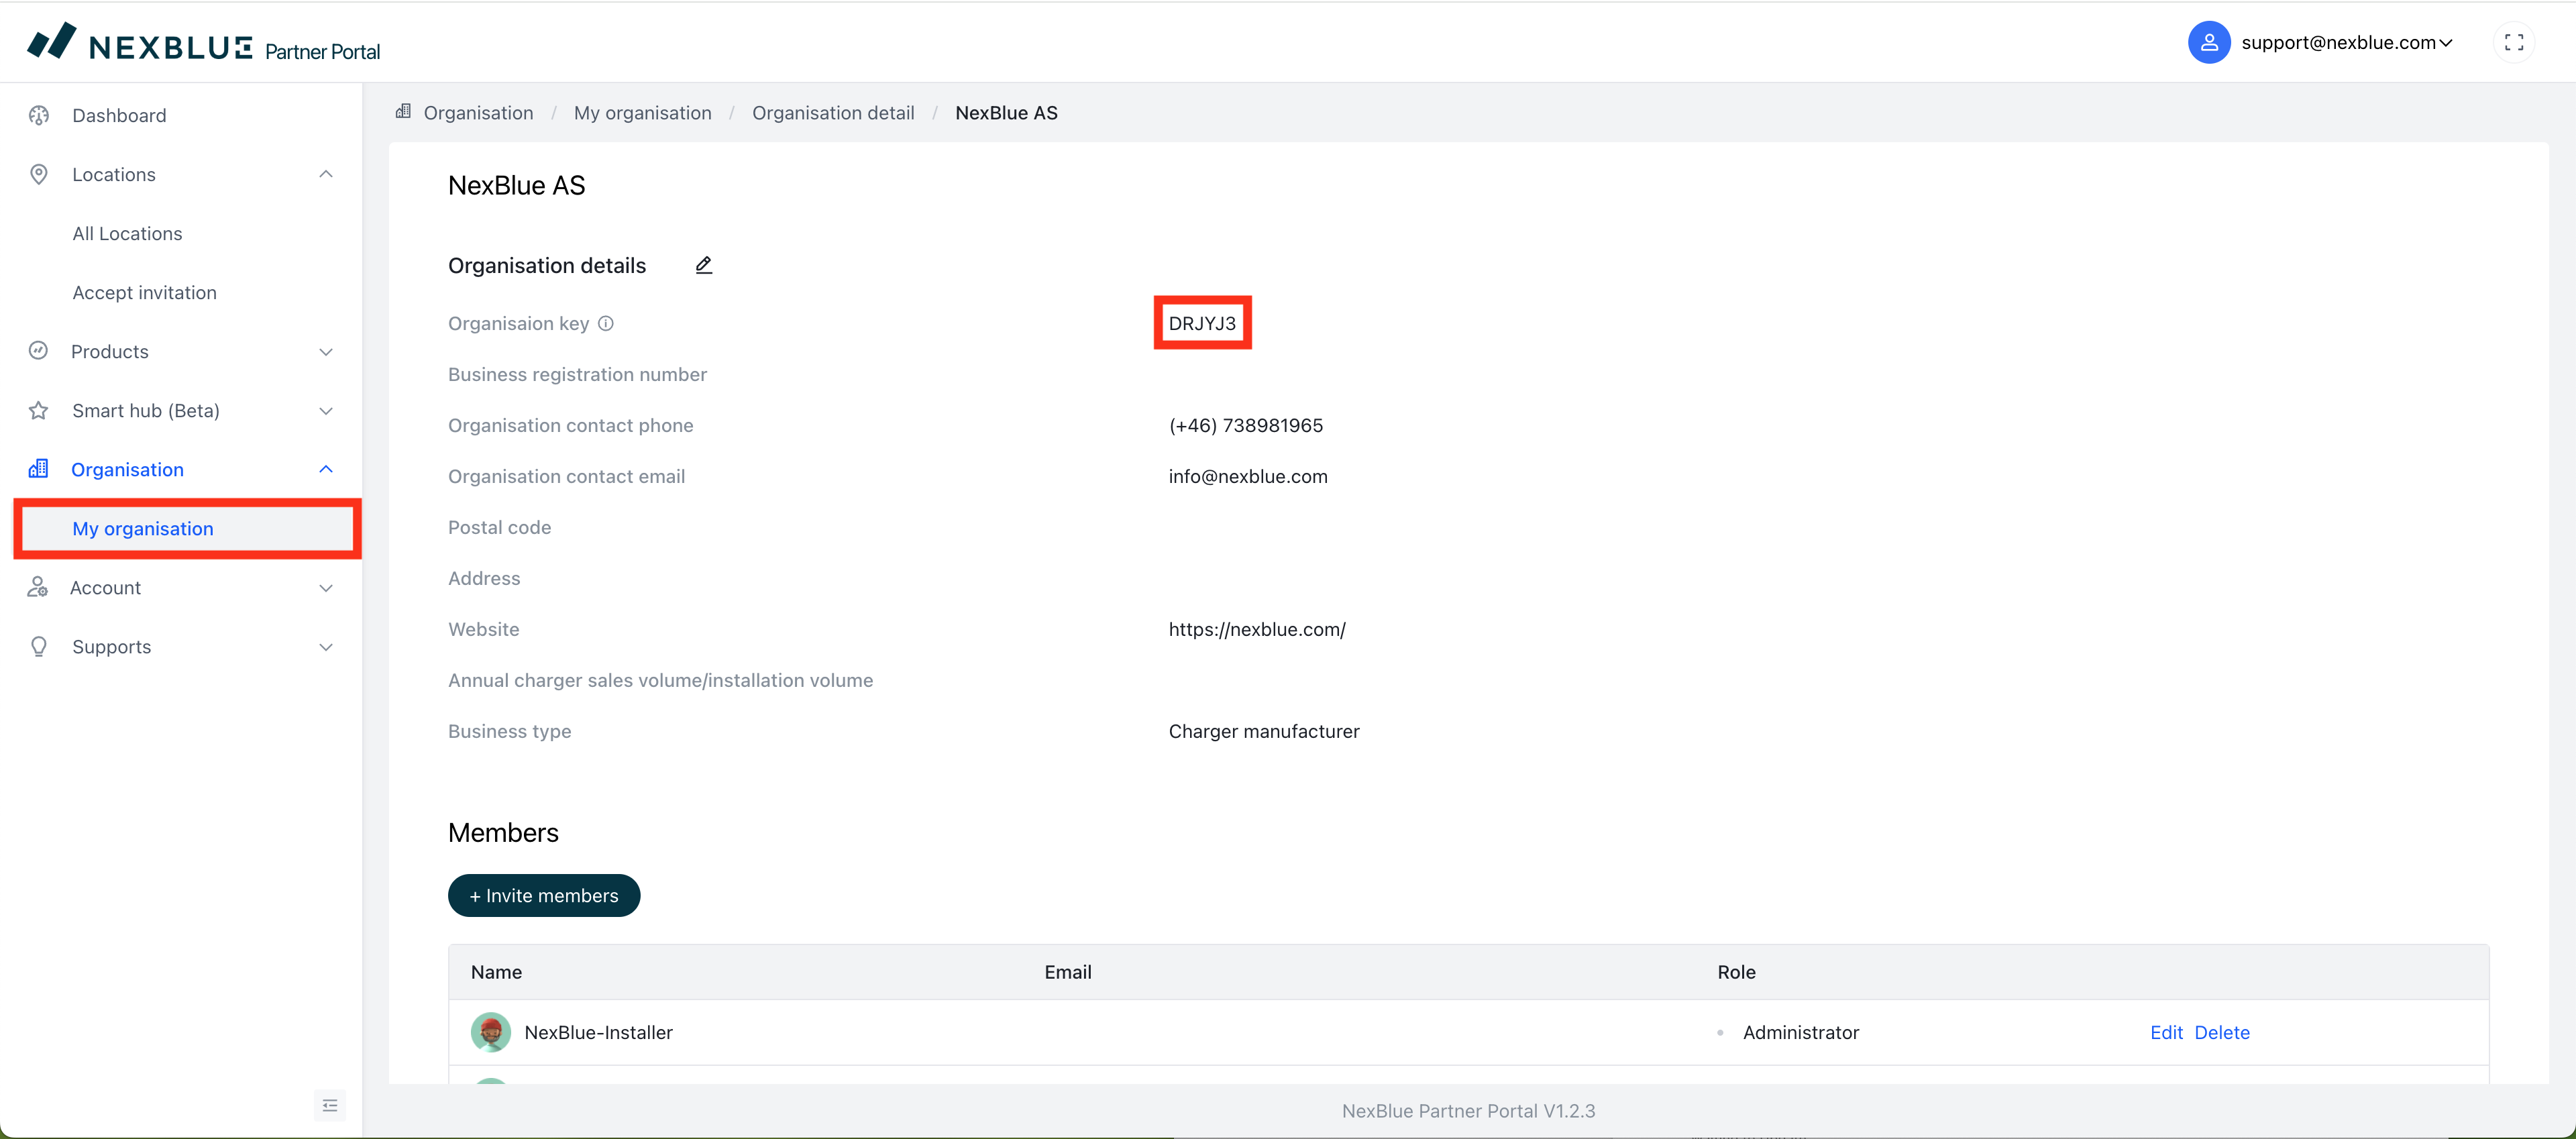
Hvis du vil dele placeringen med en organisation i stedet for med en bestemt person, kan du bruge den "organisationsnøgle", der findes i systemet. Denne skal du få af organisationen selv. Nedenstående skærmbilleder viser, hvordan de kan få fat i den og give den videre til dig.
Når du har fået den organisationskode, som du vil dele placeringen med, skal du følge nedenstående trin for at dele den med dem. Invitationen sendes til alle medlemmer af organisationen med rollen "Administrator".
Sådan deler du via invitationskode
Hvis du ikke har de oplysninger om installatøren, du skal dele med, enten deres e-mailadresse eller nøglen til den organisation, de er en del af, kan du i stedet dele placeringskoden for webstedet. Gå til fanen Tilladelser som beskrevet i de to første instruktioner for den specifikke placering, men når du klikker på "Inviter partner", skal du i stedet vælge "Del via invitationskode". Denne kode er unik og kan sendes til den person, som placeringen skal deles med, men koden er kun gyldig i 7 dage fra oprettelsen. Der kan genereres en ny kode, som kan deles efter 7 dage. Trinene, der skal følges for at tilføje placeringen ved hjælp af en kode, er beskrevet i denne vejledning.

Opdateret den 18. maj 2026