
Hola, ¿en qué podemos ayudarle?
- Cómo transferir una ubicación entre usuarios finales
- Lista de comprobación de la instalación
- Resolución del error de espera de reserva (solo para instaladores)
- Cómo poner en servicio un Point NexBlue
- Cómo conectar el punto de carga a 4G durante/después de la instalación
- Cómo crear y gestionar ubicaciones
- ¿Qué es una ubicación y por qué es importante?
- Cómo transferir la propiedad al cliente (aplicaciónNexBlue )
- Rotación de fase
- Error de espera de reserva
- ¿Dónde está el pin de mi punto de recargaZen?
- Cómo hacer que un punto de carga quede conectado (el cable permanece enchufado)
- Cómo cambiar el brillo de la luz del punto de carga
- Cómo añadir un punto de recarga/equilibrador de carga a tu ubicación
- Cómo poner en servicio un Point NexBlue
- Cómo conectar el punto de carga a 4G durante/después de la instalación
- Procedimiento de prueba del RCD
- Cómo comprobar si un producto ha experimentado algún comportamiento inesperado
- Protección contra corriente residual
- Rotación de fase
- Conecte el NexBlue Zen equilibrador de carga) a NexBlue
- Error de espera de reserva
- ¿Dónde está el pin de mi punto de recargaZen?
- Resolución del error de espera de reserva (solo para instaladores)
- Cómo añadir un punto de recarga/equilibrador de carga a tu ubicación
- Cómo utilizar la energía solar para cargar tu coche
- Cómo comprobar si un producto ha experimentado algún comportamiento inesperado
- Cómo conectar el NexBlue Zen medidor inteligente) a Wi-Fi
- Integrar el terminal del panel solar con el equilibrador de carga.
- Cómo añadir una ubicación que se ha compartido contigo
- ¿Dónde está el pin de mi punto de recargaZen?
- Cómo compartir una ubicación con una persona/organización
- Cómo crear/unirse/invitar a alguien a una organización
- Cómo conectar el punto de carga a 4G durante/después de la instalación
- Cómo realizar un restablecimiento de fábrica de un producto
- Cómo crear y gestionar ubicaciones
- Cómo comprobar si un producto ha experimentado algún comportamiento inesperado
- Estado de carga
- Rotación de fase
- Cómo transferir la propiedad al cliente final (Portal de socios)
- Pre-configuration: Remotely complete the installation configuration on the portal
- ¿Todos los nuevos instaladores necesitan obtener un nombre de usuario y una contraseña?
- ¿Cómo cambiar el fusible principal en el Portal del socio?
- Cómo transferir una ubicación entre usuarios finales
- Cómo conectar un cargador a WiFi
- Exportación de datos de carga
- Conecte el NexBlue Zen equilibrador de carga) a NexBlue
- Error de espera de reserva
- ¿Dónde está el pin de mi punto de recargaZen?
- Cómo hacer que un punto de carga quede conectado (el cable permanece enchufado)
- Cómo cambiar el brillo de la luz del punto de carga
- Cómo añadir un punto de recarga/equilibrador de carga a tu ubicación
- Cómo conectarse a su tarifa (EcoPilot)
- Cómo configurar la corriente máxima de carga
- Cómo configurar el horario de carga
- Otra persona quiere utilizar mi punto de recarga, ¿cómo puedo compartirlo con ella?
- Cómo utilizar la energía solar para cargar tu coche
- Cómo añadir un punto de recarga en la aplicación myNexBlue
- Cómo conectar el NexBlue Zen medidor inteligente) a Wi-Fi
- ¿Cómo configurar la carga monofásica?
- El cargador o el equilibrador de carga no se conecta por Bluetooth
- Requisitos de firewall para NexBlue Puntos de carga
- Resolución del error de espera de reserva (solo para instaladores)
- ¿Por qué he recibido una alerta por correo electrónico sobre mi(s) punto(s) de recarga?
- Mi punto de recarga está encendido, pero la luz de la unidad no se enciende.
- Procedimiento de prueba del RCD
- Lista de eventos
- Cómo comprobar si un producto ha experimentado algún comportamiento inesperado
Preconfiguración: complete de forma remota la configuración de la instalación en el portal.
Índice
Esta función es exclusiva para los miembros de la organización. Si no encuentra la opción «Preconfiguración» en el menú, compruebe que su cuenta haya sido aprobada para obtener permisos de la organización.
¿Para qué situaciones está preparada la preconfiguración?
- Instalación de cargadores a granel: Imagina que recibes un pedido para instalar 20 cargadores. Esto significa que dedicarás una cantidad considerable de tiempo a la instalación y la configuración. Con la función de preconfiguración, puedes marcharte después de completar la instalación y encender los cargadores. Siempre que los cargadores se conecten a la red 4G, puedes volver a casa y configurar estos cargadores por lotes a través del portal.
- Asistencia para instaladores no expertos: Es posible que algunos de sus socios instaladores sean expertos en instalación, pero no estén familiarizados con la configuración de aplicaciones. Con la función de preconfiguración, solo tienen que registrar la información del circuito y enviársela, lo que le permite completar la configuración en el portal.
Cómo preconfigurar
- Vaya a Smart Hub (Beta) > Preconfiguración.
- Puede crear una nueva ubicación para los cargadores o seleccionar una existente que se ajuste a su instalación. Cuando añada un cargador a una ubicación o circuito existente, se configurará automáticamente en función de esos ajustes.
- En la sección del cargador, puede añadir uno o varios cargadores, todos ellos con la misma ubicación y los mismos ajustes de circuito. Solo tiene que asegurarse de que el número de serie (SN) y el código PIN sean correctos; de lo contrario, no podrá enviarlos.
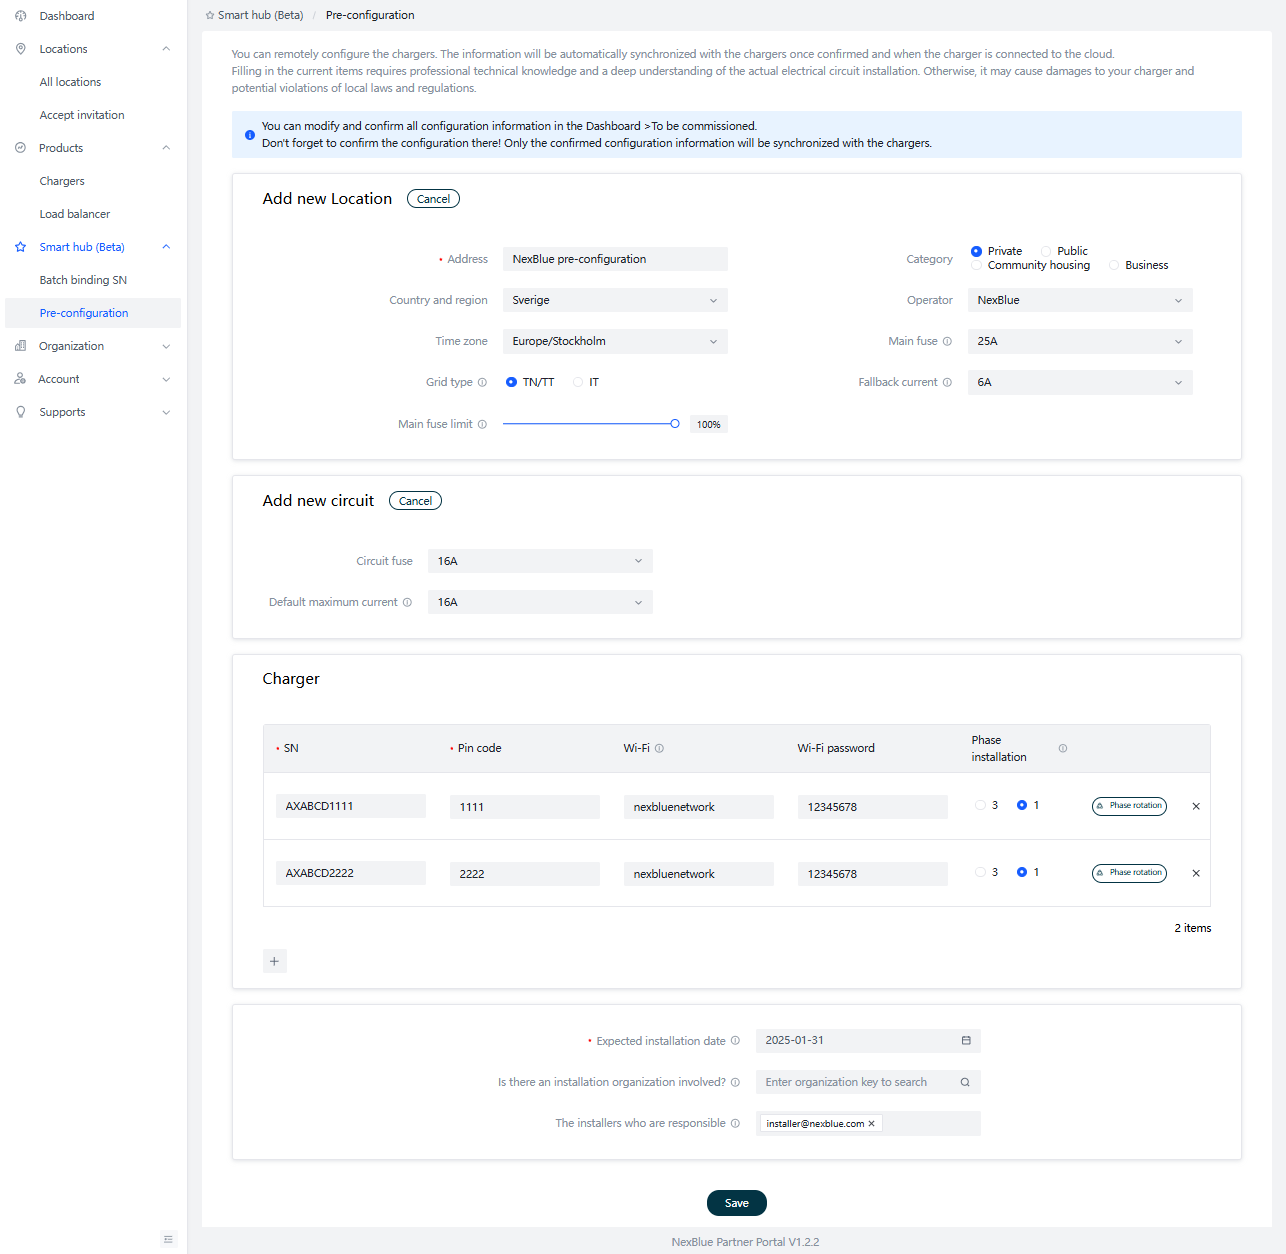
Su organización obtendrá automáticamente acceso al proceso de preconfiguración y se convertirá en socio de la ubicación una vez instalada. Si tiene otros socios, como una empresa de instalación externa o instaladores contratados, introduzca sus datos en la parte inferior de la página. Recibirán una notificación por correo electrónico para completar la instalación y obtendrán acceso para gestionar el proceso de preconfiguración y la ubicación.
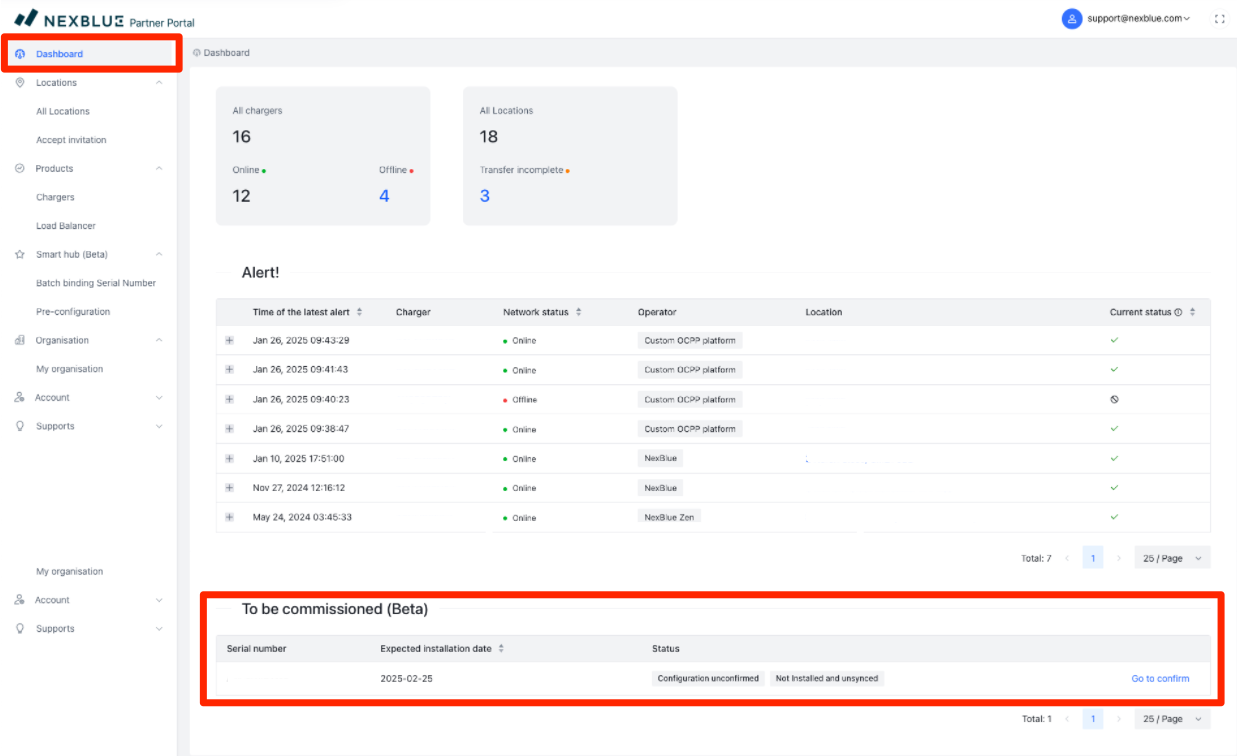
Toda la información de la página se guardará como borrador, lo que le permitirá modificarla antes de confirmarla. ¡Recuerde confirmar la configuración! Solo la información confirmada se sincronizará con los cargadores. Puede modificar y confirmar todos los detalles de la configuración en el Panel de control > Pendiente de puesta en servicio.
Si hay algún problema con los cargadores confirmados, puede actualizar la información tal y como lo haría con los cargadores ya instalados.
Finalización de la configuración
Para finalizar la configuración, deben cumplirse dos requisitos:
- El cargador debe estar instalado y conectado correctamente a la nube a través de 4G.
- La configuración debe confirmarse.
Para confirmar la configuración y enviar los datos a los puntos de recarga incluidos para la ubicación, busca la ubicación en la parte inferior del panel de control y haz clic en «Ir para confirmar». Esto debe hacerse a través del portal para socios.
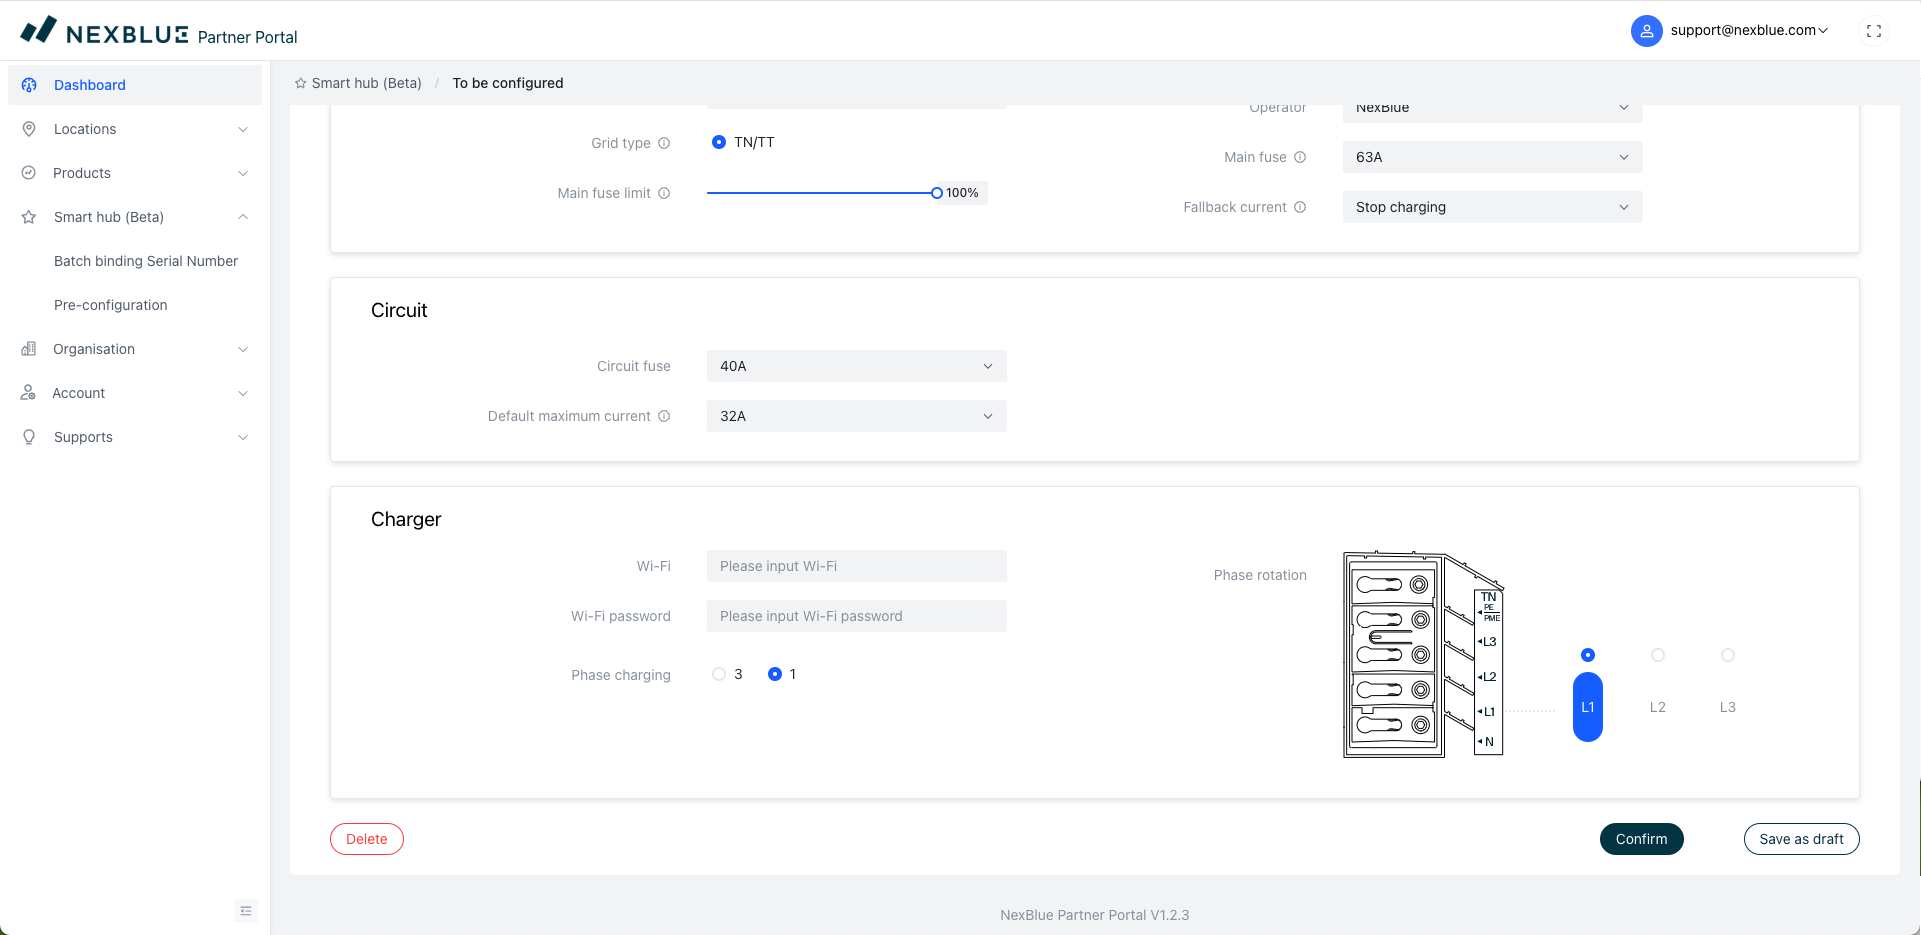
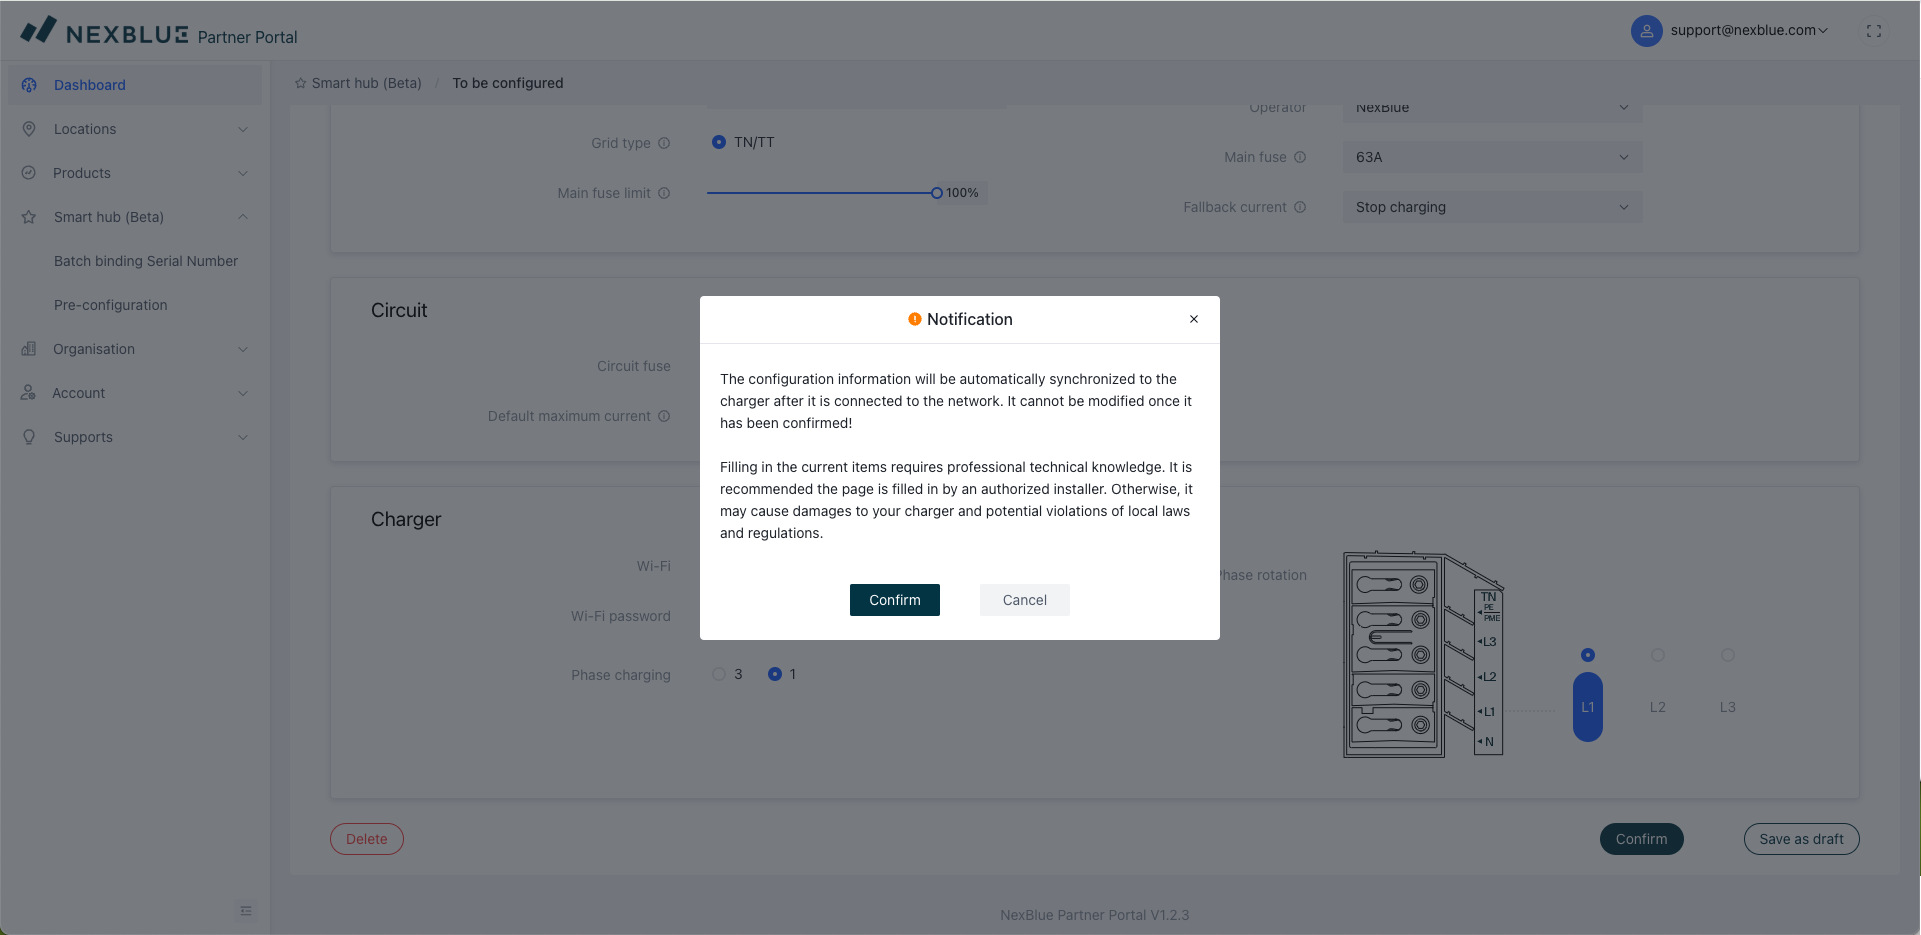
Si aún desea continuar con la configuración, haga clic en «Confirmar» en la parte inferior. A continuación, aparecerá una pantalla con información detallada sobre la importancia de que los datos sean correctos y los posibles riesgos de enviar información incorrecta. Si está de acuerdo, haga clic en «Confirmar» por última vez para enviar los datos de configuración. Siempre que las unidades tengan señal 4G, se conectarán a la ubicación.
Cómo transferir la propiedad
A diferencia de la preconfiguración, la propiedad se puede transferir a través del Portal NexBlue mediante esta guía. o a través de la aplicación NexBlue App siguiendo esta guía.
Actualizado el 18 de mayo de 2026